Home > Blog > Mastering > Mastering Insights
When bouncing down your audio mixes it is often necessary to reduce their sample rate and bit depth in order create a lower resolution audio file. This can lead to quantization errors (i.e. distortion). At this point, dithering in audio processing comes to the rescue!
Dithering is a technique used in digital audio to introduce random noise into the signal to reduce quantization errors. These errors are introduced when the analog signal is converted to digital by rounding off values to the nearest available bit depth. The random noise created by dithering masks quantization errors and improves the perceived audio quality.
Let’s discover what dithering is, why it is important and when and how to use it in audio processing.
Table Of Contents
1. What Is Dithering In Audio Processing?
2. The Problem: Quantization And Quantization Errors
3. The Solution: Masking Quantization Errors Via Dithering
4. When To Use Dithering In Audio Processing
5. How To Use Dithering In Audio Processing
6. Dithering Done Right

1. What Is Dithering In Audio Processing?
In essence, dithering is a technical process which is adressing the problem of quantization distortion in audio conversion by masking it through introducing low-level noise (i.e. white noise). Already confused? Let’s shed some light on the matter!
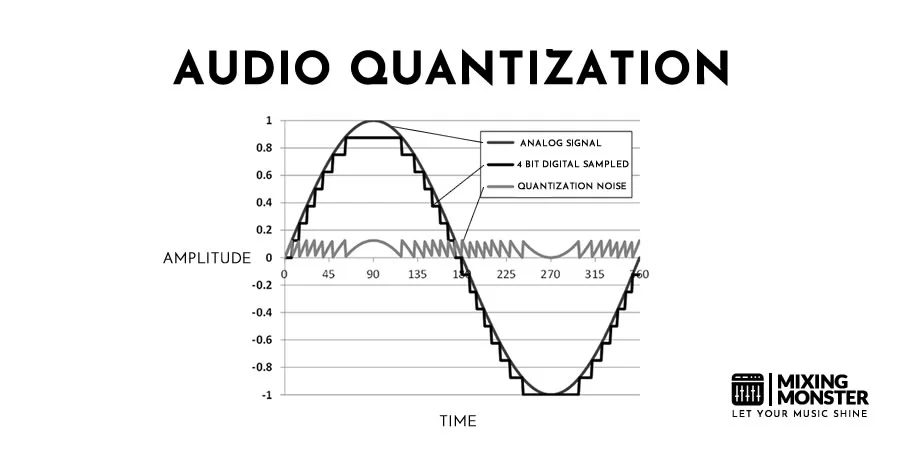
When an analog audio signal is sampled and converted to digital form, the analog signal’s continuous amplitude values (imagine an audio waveform) are rounded off. This is a process that needs to happen in the conversion process.
Depending on the chosen bit depth, the amplitude values are rounded off to the nearest so called quantization level. For example, if the bit depth is 16 bits, there are 65,536 quantization levels available to represent the amplitude values of the analog signal. This process can result in quantization errors, where the amplitude of the digital signal differs from the original analog signal.
These quantization errors are often noticed as audio distortion and can lead to an uneven listening experience by distracting the listener.
Dithering is a way to mitigate the impact of these quantization errors on audio quality. It works by adding a low-level, random noise signal to the analog signal prior to quantization.
This noise signal is carefully chosen to have a uniform distribution and a very small amplitude. Most of the time it is barely perceivable. When the signal is quantized, the quantization errors become statistically dispersed among the dither noise and are less noticeable.
In this way, dithering helps to reduce the amount of audible quantization noise (i.e. distortion) in the digital signal, which results in a cleaner and more accurate representation of the original analog audio. In other words, the audible artifacts are “smoothed” out by the dithering process.
It should be noted that dithering is not required for all applications, but it is a useful tool for certain scenarios, especially when working with audio material that has a low dynamic range or high spectral content.
Let’s discuss the problem of quantization errors further.
2. The Problem: Quantization And Quantization Errors
So we want to convert analog audio into digital or a higher bit depth and sample rate into a lower one. Why would we want to do this in the first place?
Certain distribution platforms and audio playback formats are demanding lower resolution audio files. In case you mixed and mastered a track in 32-bit floating point and 96 kHz, there is a good chance your track needs to be converted to a lower resolution in order to meet compatibility standards.
The conversion process leads to our problem: quantization errors.
Quantization errors in audio conversion occur when the analog audio signal and its continuous amplitude values are rounded off to the nearest quantization level that can be represented by the chosen bit depth. A certain bit depth only allows for a certain level of quantization.
Think of this as a camera, which is only capable of capturing images in a certain pixel resolution.
For example, if the analog signal has an amplitude value of 0.75, and the bit depth is 8 bits, the nearest quantization level is 1. This means that the amplitude value of the digital signal will be represented as 1, which is not exactly the same as the original analog signal. The difference between the analog signal and the quantized digital signal is called a quantization error.
So far so good, but why is a quantization error a problem? Does it do anything?
Quantization errors can result in an audible degradation of audio quality, often described as quantization noise, which is audible as a hiss or buzz or even distortion in the digital signal. This is why dithering is used to mitigate the impact of quantization errors on audio quality, by adding a low-level, random noise signal to the analog signal before the conversion process.
3. The Solution: Masking Quantization Errors Via Dithering
Dithering works by adding a low-level, random noise signal to the analog signal prior to quantization. The purpose of the dither noise is to introduce randomness into the quantization process and reduce the impact of the mentioned quantization errors on audio quality.
The amplitude of the dither noise is typically less than the quantization noise that would be introduced by quantization alone.
The key idea behind dithering is that the human ear is more sensitive to tonal noise than to noise that is random in nature. By adding a random noise signal, the quantization errors become less perceivable, as they are spread out over a wider frequency range and appear to be background noise.
In summary, dithering works by adding random noise to the analog signal before it is being converted, which helps to hide the sonic errors and reduce the impact of quantization noise on audio quality.
4. When To Use Dithering In Audio Processing
Scenarios You May Need To Make Use Of Dithering:
- Working With Low Bit Depths:
If you are working with low bit depths (e.g. 8-bit), the quantization errors introduced during the digital conversion process can be more noticeable. Dithering can help to reduce the impact of these quantization errors and improve the perceived audio quality. - Preserving Dynamic Range:
When working with audio material that has a low dynamic range, dithering can help to preserve the dynamic range by reducing the impact of quantization errors. - Maintaining Spectral Content:
If you are working with audio material that has high spectral content, such as high frequency transients, dithering can help to preserve the spectral content by again, reducing the impact of quantization errors. - Preventing Cumulative Errors:
When multiple digital conversions are performed on the same audio signal, each conversion introduces quantization errors. Dithering can help to prevent cumulative errors that can accumulate over multiple conversions.
The typical use of dithering in the audio production process is in the final stage of audio mastering. Dithering should only be applied once, otherwise it would certainly be non benefitial to the audio quality.
In general, dithering should only be used when bouncing and exporting audio to lower sample rates and bit depths, which is referred to as downsampling (e.g. from 24 bit to 16 bit)
In case you are able to to work with higher resolution audio like 32 bit floating point while exporting your track (and there maybe is no need to downsample your project as well), dithering is not needed.
The decision to use dithering should be based on the specific requirements of your project. In some cases, the added noise from dithering may be unacceptable and not worth the potential benefits!

5. How To Use Dithering In Audio Processing
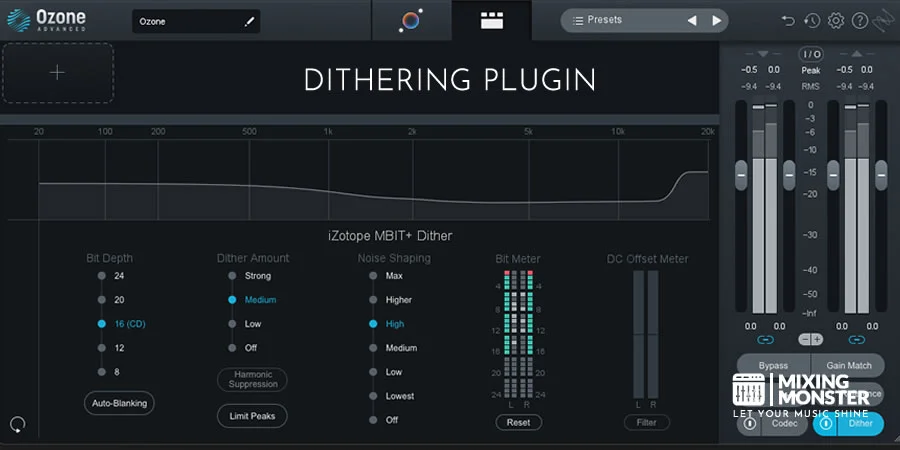
Today, dithering is typically performed by specified software, such as DAWs (digital audio workstations) or plugins. There is a variety of solutions to choose from, but the process of dithering essentially stays the same.
Dithering In Audio Processing Typically Involves The Following Steps:
- Determine The Need For Dithering:
Consider the bit depth you will be working with, the dynamic range and spectral content of the audio material, and the number of digital conversions that will be performed. If dithering is necessary, proceed to the next step. - Choose A Dithering Algorithm:
There are several dithering algorithms available, each with its own strengths and weaknesses. Some common dithering algorithms include triangular dithering, rectangular dithering, and shaped dithering. You will need to choose the dithering algorithm that is best suited for your specific requirements. - Set The Dither Amplitude:
The amplitude of the dither noise is an important consideration, as it affects the trade-off between reducing quantization errors and adding noise to the signal. You will need to set the dither amplitude to a level that is low enough to minimize the impact of the added noise, but high enough to reduce the quantization errors to an acceptable level. - Add Dithering To The Signal:
Once you have chosen the dithering algorithm and set the dither amplitude, you can add the dither noise to the analog signal prior to quantization. - Perform Quantization:
After adding the dither noise, the signal can then be quantized to the desired bit depth. - Evaluate The Results:
Listen to the quantized signal and evaluate the results. If the quantization noise is audible and unacceptable, you may need to adjust the dithering algorithm or dither amplitude and repeat the process. - Repeat Dithering As Necessary:
Repeat the process as necessary to achieve the desired audio quality.
The specific tools and software you will need to use dithering will depend on your specific audio processing requirements and the software you are using. Some digital audio workstations (DAWs) and audio processing software include built-in dithering functionality, while others may require the use of third-party plugins or add-ons.
6. Dithering Done Right
In summary, to use dithering in audio processing, you will need to choose a dithering algorithm, set the dither amplitude, add the dither noise to the signal, perform quantization and evaluate the results.
What may seem overwhelming at first, should become a fairly quick and common task when bouncing down your audio. The best workflow when dithering audio depends on the specific requirements of your project and the tools and software you are using.
It is important to note that the presented workflow is just a general guideline and may vary depending on your specific needs. Nonetheless, dithering should not be seen as a diffcult hurdle. Just make it a habit to apply dithering before lowering the resolution of your audio tracks.
Try to work with the highest resolution audio “as long as possible” until you face the need to downsample your material. Depending on the desired bit depth, apply reasonable dithering (adjusted algorithm and amplitude) once before bouncing down your track and you are good to go.

