Home > Blog > Mixing > Mixing Techniques
Affiliate Disclaimer: We may earn a commission if you purchase through our links
Mix bus compression is a powerful, yet often misunderstood technique. By understanding its purpose and learning how to apply it effectively, you can achieve greater cohesion, balance, and impact in your productions. In this article, we’ll delve into the world of mix bus compression, exploring its intricacies and sharing valuable tips for mastering this essential mixing tool.
Mix bus compression in audio mixing refers to applying compression to the stereo mix bus, affecting the entire mix. Its purpose is to control dynamic range, enhance loudness, and create a cohesive sound. Key parameters include threshold, ratio, attack, release, and makeup gain, with various compressor types available for different sonic characteristics.
Unlock the secret to creating a polished, professional sound with mix bus compression in audio mixing. Dive into the art of blending elements seamlessly and transforming your mix into a cohesive, dynamic masterpiece.
Table Of Contents
1. Definition And Purpose Of Mix Bus Compression
2. Common Types Of Mix Bus Compressors
3. Mix Bus Compression Settings And Parameters
4. Mix Bus Compression Techniques And Tips
5. Effective Mix Bus Compression In Various Genres
6. Common Mix Bus Compression Mistakes
7. Mix Bus Compression Interactions With Other Processing
8. Bypassing Mix Bus Compression
9. Mix Bus Compression: Create Cohesive, Dynamic Mixes

1. Definition And Purpose Of Mix Bus Compression
Mix bus compression is the process of applying compression to the stereo mix bus or the master output of an audio mixing session.
It affects the entire mix as a whole, helping to create a cohesive sound, control dynamic range, and enhance the overall loudness and tonal balance. It aims to glue the individual elements of a mix together.
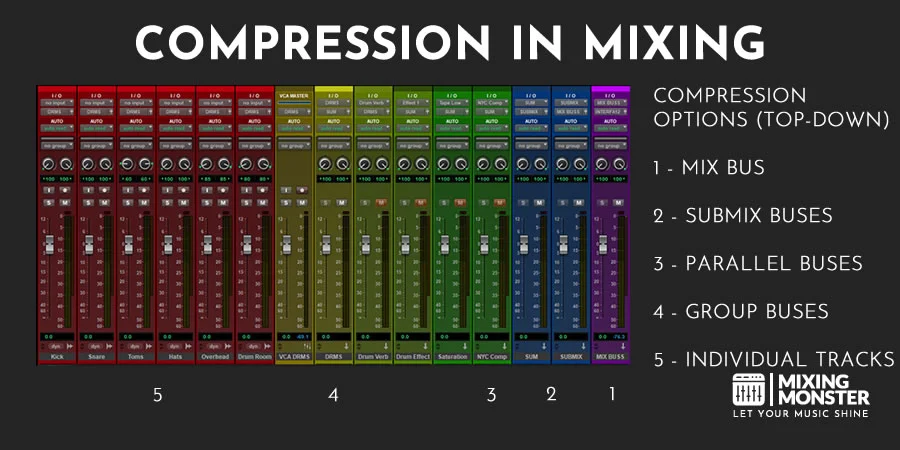
In contrast to mix bus compression, individual track compression involves applying compression to specific tracks or channels within the mix.
This type of compression is used to control the dynamics of individual instruments or vocals, ensuring that they sit well in the mix without dominating or getting lost.
Individual track compression is often applied during the early stages of mixing and serves to shape the sound of the specific elements within a mix rather than the mix as a whole.
Using global mix bus compression in audio mixing serves several important goals, which contribute to creating a well-balanced and professional-sounding mix.
Goals Of Mix Bus Processing:
- Glueing Elements Together:
Mix bus compression helps to blend the various elements of a mix, creating a sense of cohesion and unity. By subtly reducing the dynamic differences between tracks, it makes the mix feel like a single, coherent piece of music rather than a collection of individual sounds. - Controlling Dynamic Range:
The dynamic range of a mix is the difference between the loudest and quietest parts. Mix bus compression can help tame the overall dynamic range, ensuring that the mix doesn’t have excessive peaks or dips in volume. This makes the mix more consistent and easier to listen to, especially on different playback systems. - Enhancing Overall Loudness:
Mix bus compression can increase the perceived loudness of a mix without significantly increasing the actual peak levels. By controlling the dynamic range, it allows for higher average levels, making the mix sound louder and more impactful. - Improving Tonal Balance:
When applied correctly, mix bus compression can help enhance the tonal balance of a mix. By gently compressing the mix as a whole, it can smooth out any frequency imbalances (like resonant peaks) and ensure that all elements are represented fairly in the final mix. - Adding Character And Warmth:
Some mix bus compressors, especially analog or analog-modeled ones, can impart a pleasing sonic character to the mix. This can add warmth, depth, and a sense of space, making the mix sound more engaging and polished.
Through mix bus compression audio engineers and mixers can create a professional and polished final mix that translates well across different playback systems and environments with a fairly convenient and global processing move.
Mix bus compression is a huge part of the “Top-Down Mixing” mindset. In case you are interested in learning more about this crucial concept in audio mixing, you’ll find a comprehensive article here:
2. Common Types Of Mix Bus Compressors
There are several types of compressors commonly used for mix bus compression, each with its unique characteristics and sonic qualities. Understanding the differences between them can help you choose the right compressor for your mix.
When it comes to mix bus compressors, you have the option of using either hardware units or software plugins. Both options have their merits and can be effective in achieving the desired sound.
Hardware units are often favored for their unique analog warmth, character, and tactile control, providing a hands-on experience that some engineers find more inspiring and intuitive. Additionally, hardware units can introduce subtle non-linearities and harmonic content that can be difficult to replicate precisely with software plugins.
On the other hand, plugins offer flexibility, cost-effectiveness, and the ability to recall settings instantly.
Ultimately, it’s essential to consider your workflow, budget, and sonic preferences when deciding between hardware and software mix bus compressors.
Popular Types Of Mix Bus Compressors:
- VCA (Voltage Controlled Amplifier) Compressors:
VCA compressors use a voltage-controlled amplifier to control the gain reduction. These compressors are known for their fast response, precision, and low distortion. They work well in a wide range of applications, making them versatile and popular choices for mix bus compression. Famous VCA compressors include the SSL G Series Bus Compressor and the API 2500.
- FET (Field Effect Transistor) Compressors:
FET compressors use a field-effect transistor to emulate the behavior of a valve or tube circuit. They are known for their fast attack times and ability to add color and character to the sound. FET compressors can impart a sense of warmth and presence to a mix, making them well-suited for mix bus compression in certain genres. The Universal Audio 1176 is a classic example of a FET compressor.
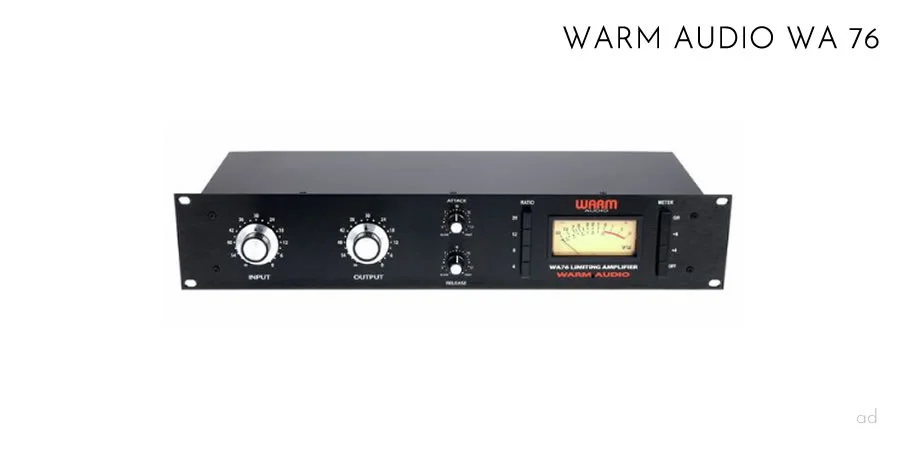
The Warm Audio WA76 Compressor:
We highly recommend the Warm Audio WA76 compressor, a modern homage to the legendary Universal Audio 1176. Its unmistakable character, warmth, and punch have made this iconic compressor a staple in professional studios worldwide, all at an accessible price point. You can elevate your mixes with the classic sound and sought-after versatility of the WA76.
- Optical Compressors:
Optical compressors use a light-sensitive element (like a photocell) to control gain reduction. The light source’s intensity determines the amount of compression, and the light-sensitive element’s response to this light determines the compressor’s attack and release characteristics. Optical compressors are known for their smooth, natural, and musical compression, which can be especially useful for mix bus compression. The Teletronix LA-2A is a famous example of an optical compressor.
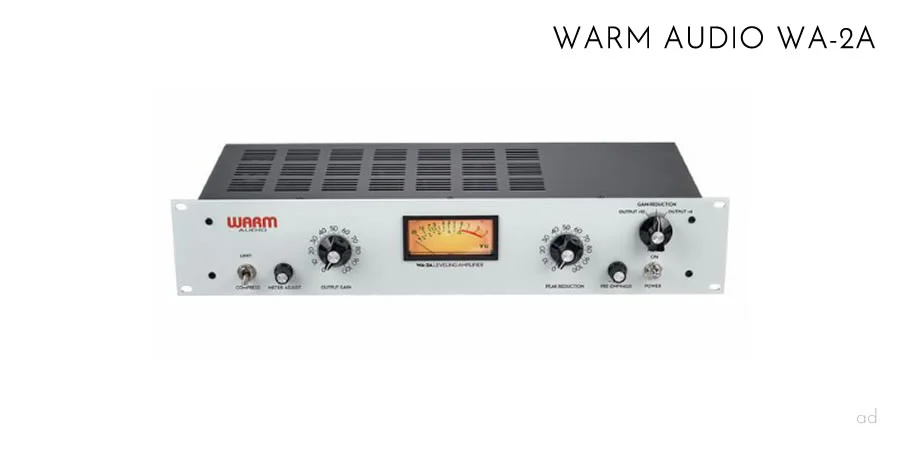
The Warm Audio WA-2A Compressor:
The Warm Audio WA-2A compressor is a faithful reproduction of the revered Teletronix LA-2A. Smooth, transparent compression and rich harmonic warmth have made this optical compressor a go-to choice for countless hit records. The WA-2A delivers vintage character and unparalleled performance that will breathe new life into your tracks at a fraction of the cost of its classic counterpart.
- Variable-Mu Compressors:
Variable-Mu compressors, also known as tube or valve compressors, use the natural characteristics of vacuum tubes to control gain reduction. These compressors are often slower in response and add a warm, rich character to the sound. They can enhance the depth and sense of space in a mix, making them popular choices for mix bus compression. The Fairchild 670 and the Manley Variable Mu are classic examples of Variable-Mu compressors.
Each of these compressor types offers unique benefits and characteristics that can impact the overall sound and feel of your mix. Choosing the right type of compressor for mix bus compression depends on the specific requirements of your project and the desired sonic outcome.

3. Mix Bus Compression Settings And Parameters
Understanding the essential parameters in mix bus compression is crucial for achieving the desired results.
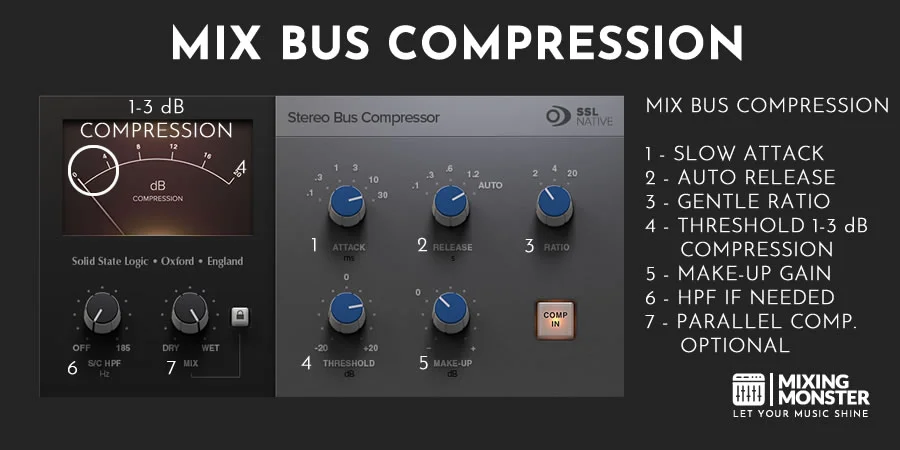
Let’s take a look at the key parameters of compressors (in mix bus compression scenarios) while providing some guidance on selecting appropriate settings for different mix scenarios:
How To Set Up Mix Bus Compression:
- Threshold:
The threshold determines the level at which the compressor starts to apply gain reduction. When the input signal exceeds the threshold, compression is engaged. Lowering the threshold results in more compression, while raising it results in less compression. In mix bus compression, set the threshold so that it compresses only the loudest peaks, ensuring a gentle and transparent compression. - Ratio:
The ratio defines the amount of gain reduction applied to the signal once it exceeds the threshold. For example, a 4:1 ratio means that for every 4 dB the input signal goes above the threshold, the output signal will only increase by 1 dB. Lower ratios (e.g., 1.5:1 or 2:1) provide gentle, transparent compression, while higher ratios (e.g., 8:1 or 10:1) result in more aggressive compression. For mix bus compression, choose a lower ratio to maintain a natural and musical sound. - Attack:
The attack time determines how quickly the compressor reacts once the signal exceeds the threshold. Faster attack times result in more immediate gain reduction, while slower attack times allow the initial transients to pass through before compression is applied. For mix bus compression, consider using a medium to slow attack time to preserve the punch and impact of the mix elements. - Release:
The release time defines how long it takes for the compressor to return to unity gain after the signal falls below the threshold. Faster release times can result in a more aggressive sound, while slower release times can create a smoother, more natural compression. In mix bus compression, adjust the release time so that the compressor recovers in time for the next transient or musical phrase, ensuring a smooth and transparent response. - Makeup Gain:
After compression has been applied, the makeup gain allows you to compensate for the reduction in overall output level. Adjust the makeup gain so that the perceived loudness of the mix remains consistent when switching between the compressed and uncompressed signal. This will help you make better judgments about the effect of the compression on your mix.
Below is a table of common mix bus compression settings that can be used as different starting points. Remember that each mix is unique, and these settings may need to be adjusted depending on the specific requirements of your project.
Common Mix Bus Compression Settings:
| Parameter | Gentle Compression | Moderate Compression | Aggressive Compression |
|---|---|---|---|
| Threshold | -2 dB to -4 dB | -4 dB to -8 dB | -8 dB to -12 dB |
| Ratio | 1.5:1 to 2:1 | 2:1 to 4:1 | 4:1 to 10:1 |
| Attack | 10 ms to 30 ms | 3 ms to 10 ms | 0.1 ms to 3 ms |
| Release | 100 ms to 300 ms | 50 ms to 100 ms | 10 ms to 50 ms |
| Makeup Gain | 1 dB to 2 dB | 2 dB to 4 dB | 4 dB to 8 dB |
Please note that these settings are just general guidelines and should be adapted to the specific needs of your mix.
When setting up mix bus compression, always trust your ears and listen carefully to how the mix bus compression is affecting the overall sound and dynamics of your mix.
The guidelines above can serve as a starting point, but remember that each mix is unique and may require different settings to achieve the desired results.

4. Mix Bus Compression Techniques And Tips
Applying mix bus compression effectively requires careful consideration of various factors. Below you’ll find some practical advice on applying mix bus compression, such as when to use it in the mixing process, parallel compression, and using multiple compressors in series or parallel.
How To Effectively Apply Mix Bus Compression:
- Timing In The Mixing Process:
While mix bus compression is typically applied toward the end of the mixing process, some engineers prefer to apply it earlier to help shape the mix as they work. Experiment with both approaches to find what works best for you. If you apply it early, remember to check and adjust the settings as your mix evolves. - Start With Conservative Settings:
Begin with gentle settings, such as a low ratio (e.g., 2:1) and a threshold that only compresses the loudest peaks. Adjust the attack and release times to suit your mix, and then gradually fine-tune the settings based on your desired outcome. - Consider Parallel Compression:
Instead of applying compression directly to the mix bus, you can use parallel compression by creating an auxiliary bus with the compressor and blending it with the uncompressed mix. This technique allows you to maintain the dynamics of the original mix while adding the desired “glue” effect from the compression. - Consider Multiple Compressors In Series:
In some cases, using multiple compressors in series with different settings can yield a more natural and transparent result. For example, you might use a gentle VCA compressor followed by a Variable-Mu compressor to benefit from the characteristics of both types. - Consider Multiple Compressors In Parallel:
Another approach is to use multiple compressors in parallel, each targeting different aspects of the mix. For example, you could use one compressor focused on taming the low-end and another compressor for controlling the mid-range and high frequencies. - Reference Other Mixes:
Compare your mix to professionally mixed tracks in the same genre to ensure your mix bus compression settings are delivering the desired results. Make sure to level-match the tracks for a fair comparison. - Bypass And Compare:
Regularly bypass the mix bus compressor to check how it’s affecting your mix. This will help you determine if the compression is enhancing the mix or causing any unwanted artifacts. - Adapt To The Genre:
The appropriate mix bus compression settings can vary greatly depending on the genre. For example, electronic dance music might benefit from more aggressive compression, while acoustic or classical music may require a subtler approach.
Remember that mix bus compression is a powerful tool that should be used with care. Experiment with different approaches and settings to find what works best for your mix, and always rely on your ears to make the final decisions.

5. Effective Mix Bus Compression In Various Genres
Let’s discuss some general mix bus compression techniques employed by audio engineers and producers in various genres and production styles. These examples demonstrate how mix bus compression techniques can be tailored to the specific requirements of different genres and production styles.
- Pop And Rock:
For pop and rock productions, mix bus compression is commonly used to glue the mix together and provide a sense of cohesion. Engineers might use a VCA compressor like the SSL G Series Bus Compressor or the API 2500 with a gentle ratio (2:1) and medium attack and release times. This approach can help achieve a polished, radio-ready sound without overly compressing the mix. - Electronic Dance Music (EDM):
In EDM, mix bus compression often plays a more aggressive role, enhancing the overall loudness and energy of the track. Engineers might use a combination of compressors, such as a VCA compressor for control and an FET compressor like the Universal Audio 1176 for adding character. Higher ratios (4:1 or higher) and faster attack and release times may be used to create a more pumping, energetic sound. - Jazz And Acoustic:
For jazz and acoustic music, mix bus compression is typically employed more subtly to preserve the natural dynamics and nuances of the performance. An optical compressor like the Teletronix LA-2A or a Variable-Mu compressor like the Manley Variable Mu could be used with low ratios (1.5:1 to 2:1) and slower attack and release times to maintain a transparent, smooth sound. - Hip Hop:
In hip-hop music, mix bus compression is often used to enhance the punch and impact of the drums while maintaining clarity in the vocals. Engineers might use a combination of parallel compression and multiple compressors in series or parallel. For example, a VCA compressor could be used for overall control, while an FET compressor might be applied in parallel to add character and presence to the mix. - Orchestral And Classical:
In orchestral and classical music, mix bus compression is usually applied sparingly to preserve the wide dynamic range and natural expression of the performance. A Variable-Mu or optical compressor with a low ratio (1.5:1 or 2:1) and slow attack and release times might be used to gently control peaks while maintaining a transparent, uncolored sound.
While the techniques described here are based on general industry practices, it’s essential to remember that each mix is unique and may require different approaches to achieve the desired results.
6. Common Mix Bus Compression Mistakes
While mix bus compression can significantly enhance a mix, it is essential to avoid common mistakes that can negatively impact the final result. Here are some common mistakes often made by beginners while using mix bus compression:
Common Mix Bus Compression Mistakes:
- Over-Compression:
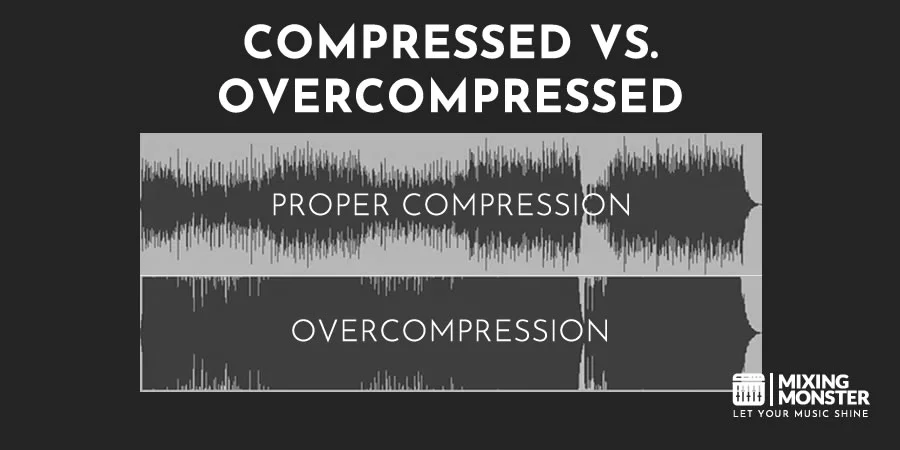
One of the most common mistakes is applying too much compression, which can result in a lifeless, flat mix with reduced dynamics and impact. To avoid over-compression, use conservative settings, and regularly compare the compressed and uncompressed mix to ensure you are maintaining the desired dynamic range. - Incorrect Settings:
Using inappropriate attack, release, threshold, or ratio settings can adversely affect your mix. For example, a fast attack time might squash the transients and make the mix less punchy, while a too-slow release time can cause “pumping” or distortion. Always trust your ears and adjust the settings based on the specific needs of your mix. - Not Accounting For Mix Balance:
Compression can change the overall balance of your mix by altering the relationship between various elements, such as vocals and instruments. It’s essential to account for these changes and make any necessary adjustments to maintain the desired mix balance. - Overlooking Makeup Gain:
Neglecting to properly adjust the makeup gain can lead to an imbalance in perceived loudness, making it difficult to accurately judge the effect of the compression on your mix. Always adjust the makeup gain to compensate for any reduction in output level caused by the compression. - Choosing The Wrong Compressor Type:
Different compressor types, such as VCA, FET, Optical, and Variable-Mu, have distinct sonic characteristics that can significantly impact your mix. Selecting the wrong compressor type can result in a mix that doesn’t achieve the desired sound or character. Make sure to choose a compressor that complements the genre and desired outcome of your mix. - Relying Solely On Presets:
While compressor presets can provide a helpful starting point, they may not always be suitable for your specific mix. Relying solely on presets can lead to suboptimal results. Always customize the settings based on your mix and trust your ears to determine the appropriate compression settings. - Not Using Compression In Context:
When adjusting mix bus compression settings, it’s crucial to listen to the mix as a whole rather than focusing on individual elements. This helps ensure that the compression is contributing positively to the overall mix and not negatively affecting specific elements.
Always be aware of these common mistakes and make sure to take the necessary steps to avoid them. Ensure that your mix bus compression enhances your mix and contributes to a polished, professional sound.

7. Mix Bus Compression Interactions With Other Processing
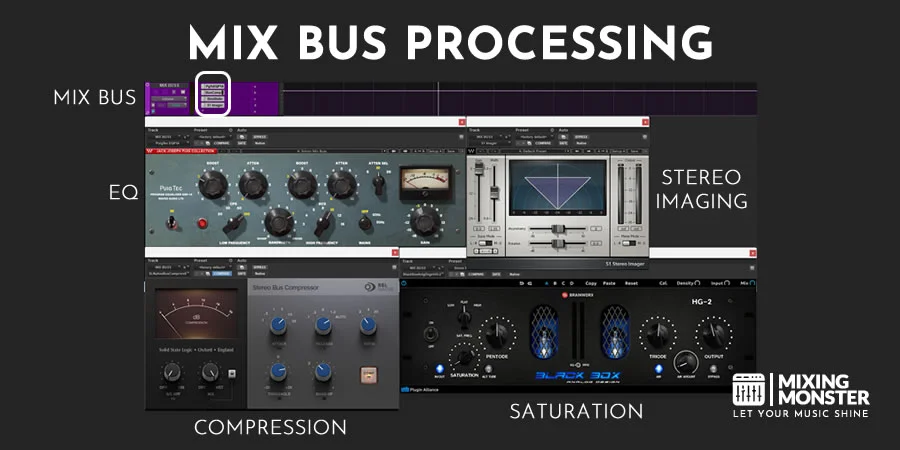
As mix bus compression is an essential part of the mixing process, it interacts with various other tools, such as equalization, saturation, and limiting which are also regularly found on the mix bus of a mixing session.
Understanding these interactions can help you make better decisions while mixing and achieve a more cohesive final result.
Equalization (EQ) and mix bus compression work together to shape the tonal balance and dynamics of your mix. Compression can affect the perceived frequency balance of your mix, as it can emphasize or de-emphasize certain frequency ranges based on their levels and dynamics.
Applying EQ before mix bus compression can help you address any tonal imbalances and ensure that the compressor responds more evenly across the frequency spectrum. Conversely, applying EQ after mix bus compression can help you fine-tune the tonal balance after the compression has been applied.
It’s essential to listen carefully and make adjustments as needed to maintain the desired tonal balance throughout the mixing process.
Saturation can add harmonic content, warmth, and character to your mix, subtly affecting the dynamics and perceived loudness. When used in conjunction with mix bus compression, saturation can enhance the sense of “glue” and cohesion in your mix.
Applying saturation before compression can help smooth out transients and create a more even response from the compressor. Alternatively, applying saturation after compression can add color and character to the compressed signal.
Experiment with different combinations of saturation and compression to find the desired sound for your mix.
Limiting is often used during the mastering stage to control peak levels and increase the overall perceived loudness. However, it can also be used in the mixing process, typically after mix bus compression.
When used together, mix bus compression and limiting can provide more control over the overall dynamic range and loudness of your mix. The mix bus compression should focus on transparently controlling the overall dynamic range and gluing the mix elements together, while the limiter can be used to catch any remaining peaks and increase the overall loudness.
It’s essential to use limiting judiciously to avoid introducing unwanted artifacts and maintain the natural dynamics and clarity of your mix.
Understanding how mix bus compression interacts with other mixing tools is crucial for achieving a polished, professional-sounding mix. By considering these interactions and making adjustments as needed, you can create a cohesive mix that retains its desired tonal balance, dynamics, and character.
8. Bypassing Mix Bus Compression
There are situations where mix bus compression might not be necessary or could be counterproductive. Here are a few scenarios where leaving the mix bus uncompressed might be advantageous:
- Highly Dynamic Material:
In genres like classical, jazz, or acoustic music, the natural dynamics and expressive qualities of the performance are crucial. Applying mix bus compression might reduce these dynamics and compromise the intended emotional impact. Leaving the mix bus uncompressed can help preserve the dynamic range and maintain the natural expression of the music. - Adequate Glue From Individual Track Compression:
If you’ve already applied compression to individual tracks and achieved a cohesive mix, adding mix bus compression may be unnecessary. Adding more compression can result in over-compression, which can make the mix sound flat and lifeless. - Sufficient Loudness From Other Processing:
If your mix is already loud enough and has a controlled dynamic range due to other processing, such as saturation or track-level compression, applying mix bus compression may not be necessary. In this case, leaving the mix bus uncompressed can help maintain the mix’s clarity and avoid introducing unwanted artifacts. - Creative Choice:
Sometimes, a more raw, unprocessed sound might be desired for artistic reasons. In such cases, leaving the mix bus uncompressed can help preserve the original character of the mix and achieve the intended aesthetic. - Avoiding Phase Issues:
Applying mix bus compression can sometimes introduce phase issues, especially when using compressors with non-linear phase characteristics. In mixes where maintaining the phase relationship between elements is critical, such as recordings made with coincident microphone techniques, leaving the mix bus uncompressed can help avoid potential phase problems. - Preparing For Mastering:
When sending your mix to a mastering engineer, it’s often beneficial to provide a version without mix bus compression. The mastering engineer might have access to higher-quality compressors or might prefer to apply their compression tailored to the specific needs of the mastering process.
It’s important to remember that every mix is unique, and the decision to apply mix bus compression should be made on a case-by-case basis. Always trust your ears and consider the specific requirements of your mix when determining whether mix bus compression is necessary or advantageous.
9. Mix Bus Compression: Create Cohesive, Dynamic Mixes
In conclusion, mix bus compression is a powerful tool that can help you create cohesive, dynamic, and polished mixes.
By understanding its principles, various compressor types, and essential parameters, you can skillfully apply mix bus compression to enhance the overall sound and character of your mix. Keep in mind that every mix is unique and requires a customized approach.
Remember to listen carefully, experiment with different settings, and consider how mix bus compression interacts with other mixing tools like equalization, saturation, and limiting. Be mindful of the potential pitfalls and situations where mix bus compression might not be necessary or could be counterproductive.
With practice and experience, you can master the art of mix bus compression and create professional-sounding mixes that resonate with your listeners. So, go forth and bring your musical creations to life with the power of mix bus compression!


