Home > Blog > Mixing > Mixing Techniques
Affiliate Disclaimer: We may earn a commission if you purchase through our links
In the world of audio mixing, achieving a balanced and polished sound is the ultimate goal. Mix bus processing plays a crucial role in this process, helping to shape the overall tonality, dynamics, and stereo image of your mix, leading to professional-sounding results.
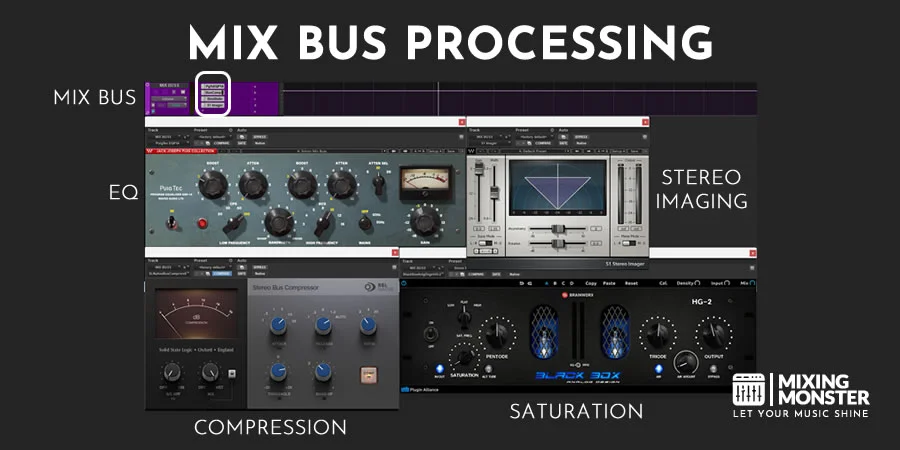
Mix bus processing in audio mixing refers to the application of processing techniques to the mix bus or master channel in a DAW, which consolidates all individual tracks into a final stereo mix. These techniques include EQ, compression, saturation and stereo imaging, which shape the overall tonality, dynamics, and spatial characteristics of the mix.
Unlock the true potential of your audio mixes with mix bus processing techniques, elevating your tracks to a professional level. Dive into the art of mix bus processing and discover how it can transform crucial aspects of your music.
Table Of Contents
1. Introduction To Audio Mixing And Mix Bus Processing
2. The Mix Bus: Definition, Setup, Signal Flow And Components
3. Popular Mix Bus Processing Techniques
4. Best Practices For Mix Bus Processing
5. How To Choose The Right Mix Bus Processing Tools
6. Mix Bus Processing In Various Music Genres
7. Common Mix Bus Processing Mistakes And How To Avoid Them
8. Mastering And Its Relationship To Mix Bus Processing
9. The Mix Bus: Achieve Your Own Desired Sound

1. Introduction To Audio Mixing And Mix Bus Processing
Audio mixing is the creative process of blending and balancing various recorded elements, such as instruments and vocals, to create a cohesive and harmonious final product.
It involves adjusting levels, panning, equalization, and applying effects, among other tasks, to achieve the desired sonic balance and impact.
Mix bus processing, on the other hand, refers to the application of processing techniques to the mix bus or master channel, which consolidates all individual tracks into a final stereo mix.
The purpose of mix bus processing is to shape the overall tonality, dynamics, and stereo image of the mix, enhancing the sonic quality, and achieving a polished, professional sound.
By applying techniques such as equalization, compression, saturation, and stereo imaging to the mix bus, engineers can make general arrangements that bring cohesion and unity to the entire mix, while maintaining the integrity of individual elements.
In the context of the top-down method, mix bus processing is an approach that prioritizes global adjustments to the entire mix before focusing on individual elements. This method involves applying processing to the mix bus or master channel first, rather than starting with individual tracks.
The goal of the top-down method is to achieve a cohesive and balanced mix more quickly by addressing the overall tonality, dynamics, and stereo image from the beginning. This way, engineers can establish a solid foundation and reduce the need for excessive processing on individual tracks later.
Once the mix bus processing has been set, engineers then proceed to address the individual elements (or other submix or group buses), making more precise and subtle adjustments to fine-tune the mix.
This approach can lead to a more natural-sounding mix, as it encourages engineers to focus on the bigger picture and ensures that each individual track complements the mix as a whole.
In case you want to explore the fundamentals of top-down mixing and uncover how it can elevate your audio production, here´s a comprehensive article for you:
2. The Mix Bus: Definition, Setup, Signal Flow And Components
The mix bus, also known as the master bus or stereo bus, is a crucial part of the audio mixing process. It serves as the final destination for all individual tracks or subgroups in a mix before being sent to the master output.
The mix bus plays a vital role in audio mixing by allowing engineers to apply global processing to the entire mix, ensuring that all elements blend cohesively and achieve a polished, professional sound.
Setting up a mix bus in audio mixing involves creating a dedicated channel or bus that receives and processes the combined signals from all individual tracks or subgroups.
The process may vary slightly depending on your Digital Audio Workstation (DAW) or mixing console as they may have unique methods and features for setting up a mix bus, so consult the user manual or online resources for specific guidance.
How To Set Up A Mix Bus In A Digital Audio Workstation (DAW):
- Create A Mix Bus Channel:
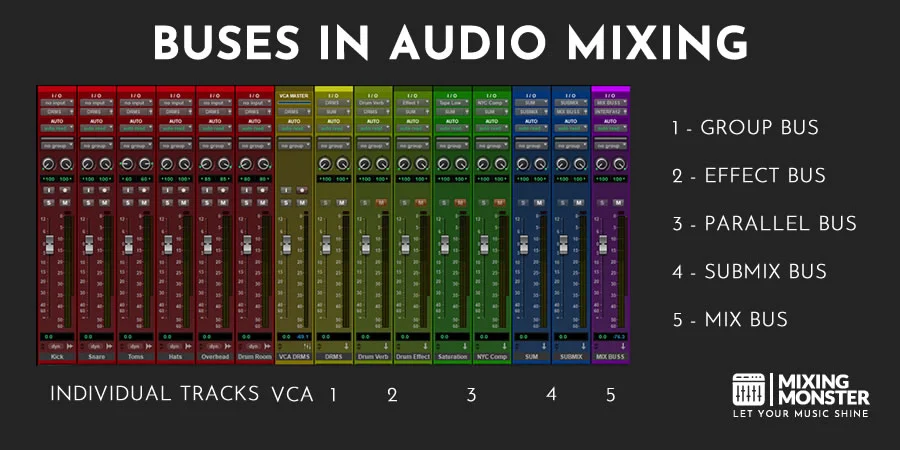
In your DAW or mixing console, create a new stereo bus or auxiliary channel. This will serve as your mix bus, where all tracks or subgroups will be routed. - Route Individual Tracks Or Subgroups:
Route the output of each individual track or subgroup to the newly created mix bus channel. This can typically be done using the output routing options available on each channel in your DAW or mixing console. - Organize Your Session:
For a more efficient workflow, consider organizing your tracks and subgroups by color-coding, labeling, or grouping them according to their roles (e.g., drums, bass, guitars, vocals) within the mix. - Apply Processing To The Mix Bus:
Add the desired processing plugins or hardware units to the mix bus channel. Start with minimal adjustments and gradually refine the settings as needed.
Signal Flow And Components In A Mix Bus:
- Input:
The mix bus receives signals from individual tracks, subgroups, or auxiliary sends. These signals are combined and routed to the mix bus input, where they are summed together to create a stereo mix. - Processing:
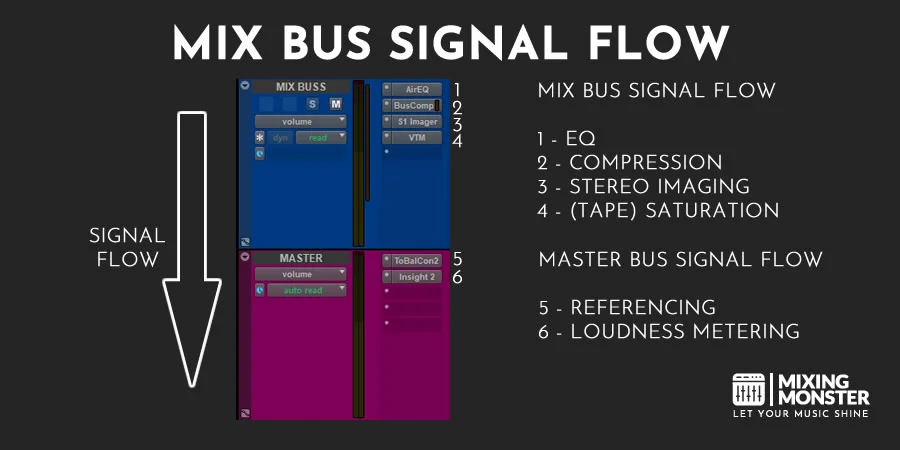
Once the signals are combined, they pass through various processing stages within the mix bus. This may include equalization (EQ) for tonal balance adjustments, compression for controlling dynamics, saturation or harmonic distortion for adding warmth and character, and stereo imaging enhancements for adjusting the spatial characteristics of the mix. - Gain Staging:
Proper gain staging is essential within the mix bus to maintain adequate headroom and avoid clipping or distortion. This involves adjusting the input and output levels of each processing stage to ensure a clean and transparent signal path. - Metering:
Visual metering tools, such as peak and RMS meters, VU meters, or loudness meters, are often used in the mix bus to monitor the overall levels, dynamics, and loudness of the mix. This helps engineers make informed decisions about gain staging, dynamics processing, and final output levels. - Output: The processed stereo mix is then routed from the mix bus to the master output, which is typically connected to monitoring systems or recording devices. In some cases, the mix may be sent to additional buses for parallel processing, stem mixing, or external hardware processing before reaching the master output.
By understanding the mix bus and its components, audio engineers can effectively utilize mix bus processing techniques to shape the overall sound of their mixes, ensuring a balanced and professional result early in the mixing phase.
3. Popular Mix Bus Processing Techniques
Proper mix bus processing techniques help shape the overall tonality, dynamics, and spatial characteristics of a mix. Let’s dive into these techniques while also providing useful settings and values:
- Level Control And Balancing:
At the mix bus level, the focus is on maintaining proper headroom and overall balance. Use a fader or gain control plugin to adjust the overall level of the mix, ensuring adequate headroom (usually between -3dB to -6dB) to avoid clipping or distortion.
Use a combination of peak, RMS, VU, or loudness meters to monitor your mix levels and make adjustments accordingly. - Equalization (EQ):
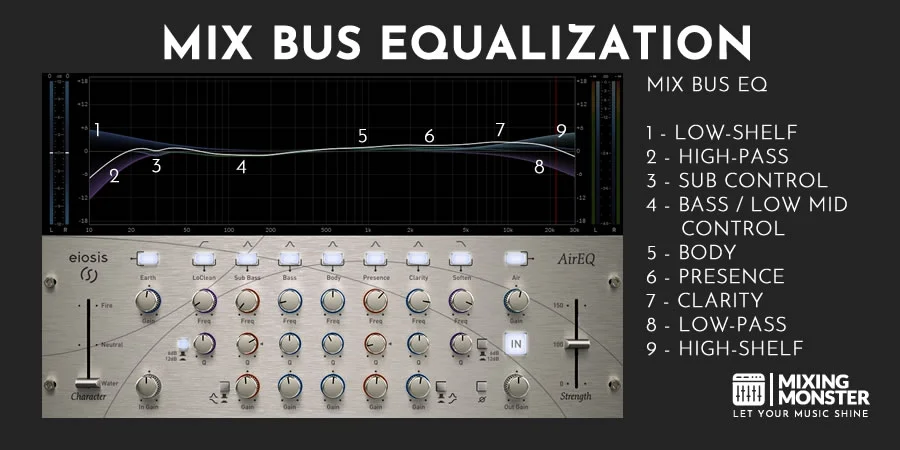
EQ is used to adjust the tonal balance of the mix. On the mix bus, gentle EQ adjustments can make a significant difference. A popular approach is to use a high-quality linear phase or mastering-grade EQ.
A common approach is to use a gentle high-pass filter (HPF) to remove any unnecessary low-end rumble (20-40 Hz) and a low-pass filter (LPF) to tame excessive high frequencies (18-20 kHz). Additionally, you can use broad EQ boosts or cuts (1-2 dB) to emphasize or de-emphasize specific frequency ranges for a more balanced mix.
Common EQ Settings On A Mix Bus:
-
-
- Low-Shelf: Boost or cut around 60-100 Hz to adjust the overall low-end presence
- High-Pass: Remove unnecessary low-end around 20-40 Hz
- High-Shelf: Boost or cut around 10-16 kHz to add air or reduce harshness in the high-end
- Low-Pass: Tame excessive high frequencies around 18-20 kHz
- Bell Curve: Use a wide Q (0.5 – 1) to make gentle boosts or cuts in the midrange as needed
-
- Compression And Limiting:
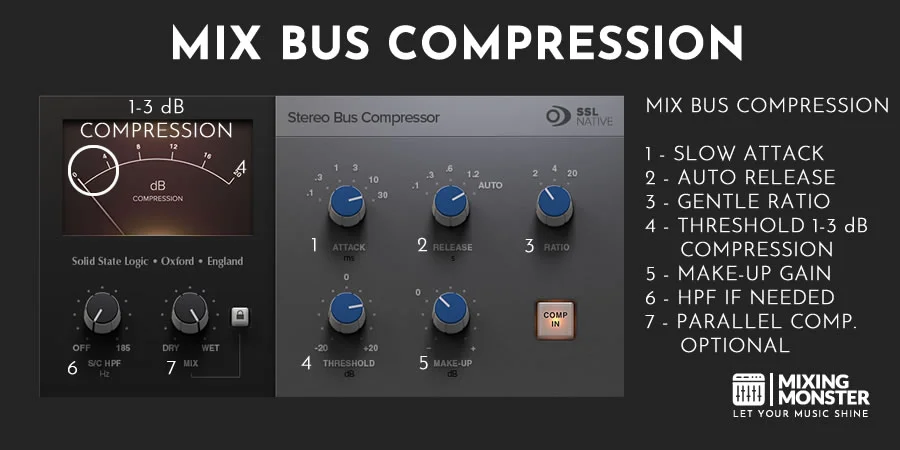
Compression on the mix bus is used to control the overall dynamics and “glue” the mix together. Use a transparent compressor or bus compressor with a gentle ratio (1.5:1 to 2:1) and a slow attack (30ms or higher) to maintain transients. Set the release time based on the tempo of the song (usually between 100-300ms).
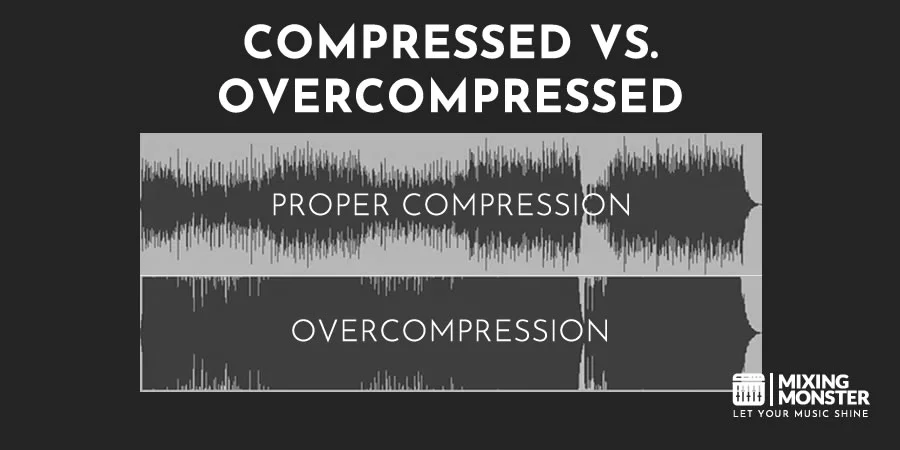
Limiting is typically used for final loudness adjustments. Apply a high-quality limiter at the end of the mix bus chain, and set the output ceiling between -0.3 dBFS to -1 dBFS to avoid inter-sample peaks. Adjust the threshold to achieve the desired loudness, but avoid over-compression, which can lead to distortion and a loss of dynamic range.
- Saturation And Harmonic Distortion:
These techniques can add warmth, character, and perceived loudness to the mix. Apply tape, tube, or console emulation plugins to the mix bus with subtle settings to enhance the overall mix without introducing excessive distortion.
Common Saturation Settings On A Mix Bus:
-
- Drive: Start low (1-3dB) and adjust to taste
- Blend: Mix in parallel, using a wet/dry control, to maintain the mix’s natural character
- Stereo Imaging And Width Enhancement:
Enhance the spatial characteristics of the mix by adjusting the stereo width and perceived depth. Use a stereo imaging plugin or Mid-Side (M/S) processing to make subtle adjustments without compromising mono compatibility.
Common Stereo Imaging Settings On A Mix Bus:
-
- Width: Start with a small increase (5-10%) and adjust to taste
- M/S EQ: Apply gentle high-frequency boosts to the Side channel to add air and width, or adjust the low-end in the Mid channel to tighten the center image
Let’s wrap things up with a quick table of these mix bus processing techniques including their impact on the mix:
Proper Mix Bus Processing:
| Technique | Common Settings | Impact on the Mix |
|---|---|---|
| Level Control and Balancing | Monitor using peak, RMS, VU, or loudness meters | Ensures proper gain staging, headroom, and balance |
| Equalization (EQ) | Gentle high-pass filter (20-40 Hz), low-pass filter (18-20 kHz), broad boosts or cuts (1-2 dB) | Adjusts tonal balance, removes unnecessary frequencies, enhances clarity |
| Compression and Limiting | Ratio (1.5:1 to 2:1), Attack (30-100 ms), Release (50-100 ms), 1-3 dB gain reduction | Controls dynamics, adds cohesion, prevents clipping and distortion |
| Saturation and Harmonic Distortion | Tape, tube, or console emulation, subtle drive or saturation levels | Enhances warmth, character, and perceived loudness |
| Stereo Imaging and Width Enhancement | Stereo width adjustments (100-120%), Mid/Side EQ, panning adjustments | Improves spatial depth, separation, and overall mix width |
Keep in mind that these settings and values are just starting points and should be adjusted according to the specific needs and characteristics of each mix. Always trust your ears and make decisions based on the musical context and desired outcome.
The importance of making subtle moves while applying mix bus processing cannot be overstated. Since mix bus processing affects the entire mix as a whole, even minor adjustments can have a significant impact on the overall sound.
Over-processing the mix bus can lead to a loss of clarity, dynamics, and naturalness, while potentially introducing unwanted phase issues, artifacts or distortion.
4. Best Practices For Mix Bus Processing
Best practices for mix bus processing help ensure a polished, professional-sounding mix while maintaining the integrity of individual tracks.
While unexperienced engineers handle the mix bus more like a “set and forget” asset, mix bus processing always needs to be revisited and monitored during the mixing phase.
Proper gain staging is crucial in mix bus processing to maintain sufficient headroom and prevent clipping or distortion. Set appropriate input and output levels for each processing stage, and keep an eye on the mix bus levels using peak, RMS, VU, or loudness meters.
Aim for an optimal balance between loudness and dynamic range, avoiding excessive levels that may compromise audio quality.
Using reference monitors or headphones, as well as metering tools, is essential for making informed decisions about mix bus processing. Calibrate your monitoring system to ensure a flat frequency response and optimal listening environment.
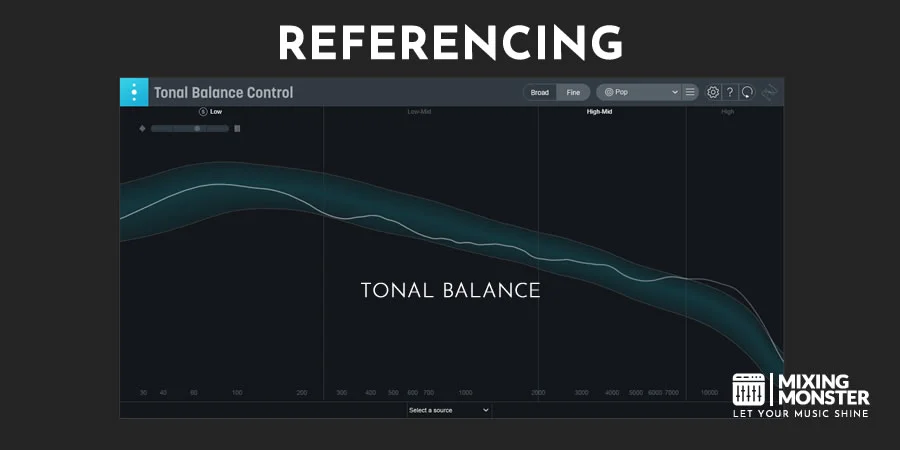
Regularly compare your mix to reference tracks in a similar genre or style to gauge the effectiveness of your mix bus processing. Employ various metering tools to monitor levels, dynamics, frequency content, and stereo imaging.
The order of processing in the mix bus can impact the overall sound. While there’s no strict rule, a common signal flow might start with level control (such as gentle compression), followed by EQ for tonal balance adjustments, saturation or harmonic distortion, and finally, stereo imaging enhancement.
Limiting is typically applied at the very end of the chain to control peaks and prevent clipping. Experiment with different processing orders to achieve the desired results.
Parallel processing can be employed to blend processed and unprocessed signals, allowing for greater control over the intensity of mix bus processing.
Create a parallel mix bus by duplicating the original mix bus or using auxiliary sends, and apply processing to the parallel bus. Blend the processed and unprocessed signals to taste, maintaining the desired balance between the original mix and the effects of mix bus processing.
By following these best practices, you can make the most of mix bus processing techniques and achieve a cohesive, professional mix that translates well across various listening environments.

5. How To Choose The Right Mix Bus Processing Tools
Choosing the right mix bus processing tools is essential for achieving a polished, professional mix.
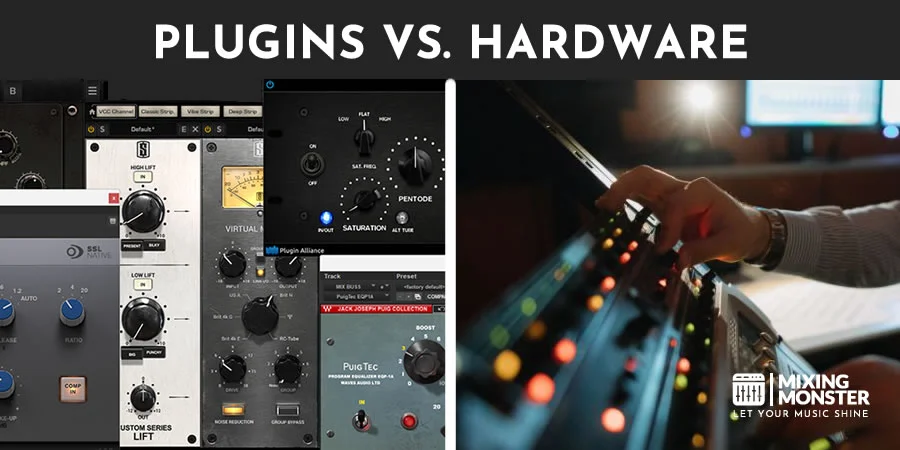
Mix bus processing tools can be divided into two main categories: plugins and hardware units. Plugins are software-based processing tools that run within your DAW, while hardware units are standalone devices connected to your mixing console or audio interface.
Like already discussed in section 3, common mix bus processing tools include equalizers, compressors, limiters, saturators, and stereo imaging processors.
Pros And Cons Of Plugins Vs. Hardware Units:
Plugins:
- Pros:
- Cost-effective and easily accessible
- Wide range of options and styles available
- Precise control and recall of settings
- Low maintenance and no need for additional cabling or physical space
- Cons:
- Can consume computer resources (CPU, RAM)
- May not fully replicate the sound and character of certain hardware units
Hardware Units:
- Pros:
- Can offer unique sonic characteristics and warmth
- May provide tactile control and hands-on experience
- Can offload processing from the computer
- Cons:
- More expensive than plugins
- Limited by physical space and cabling requirements
- Less convenient for recalling settings and project compatibility
Recommendations For Popular Mix Bus Processing Tools:
Equalizers:
-
- Plugins: FabFilter Pro-Q3, Sonnox Oxford EQ, Eiosis AIR EQ
- Hardware: Manley Massive Passive, API 5500, Neve 8803
Compressors:
-
- Plugins: Waves SSL G-Master Buss Compressor, FabFilter Pro-C2, UAD Shadow Hills Mastering Compressor
- Hardware: SSL G Series Stereo Bus Compressor, API 2500, Neve 33609
Limiters:
-
- Plugins: FabFilter Pro-L2, iZotope Ozone Maximizer, Waves L2 Ultramaximizer
- Hardware: Weiss DS1-MK3, Bettermaker Mastering Limiter, Pendulum Audio PL-2
Saturators And Harmonic Distortion:
-
- Plugins: Soundtoys Decapitator, UAD Studer A800, Waves NLS
- Hardware: Thermionic Culture Vulture, Rupert Neve Designs Portico 542, Empirical Labs Distressor
Stereo Imaging And Width Enhancement:
-
- Plugins: iZotope Ozone Imager, Waves S1 Stereo Imager, Brainworx bx_panEQ
- Hardware: SPL Vitalizer MK2-T, Bettermaker Mastering Stereo Width Controller, TC Electronic System 6000
When selecting mix bus processing tools, consider factors such as budget, personal preferences, workflow, and desired sonic characteristics.
Always trust your ears and experiment with different tools to find the ones that best suit your needs and help you achieve your creative vision.
6. Mix Bus Processing In Various Music Genres
While specific mix bus processing choices vary between genres, some general techniques are commonly applied in different genres across the board. Here’s a brief overview of mix bus processing in various music genres:
Mix Bus Processing In Various Music Genres:
- Pop:
Pop music typically aims for a polished and radio-friendly sound. In pop mixes, mix bus processing often includes:
-
- Compression: To control the overall dynamics and glue the mix together.
- Equalization (EQ): To gently shape the overall tonal balance, with a focus on boosting high frequencies for added presence and clarity.
- Stereo Widening: To create a sense of space and depth in the mix.
- Limiting: To achieve competitive loudness levels without distorting the audio.
- Rock:
Rock mixes often emphasize energy, power, and impact. Mix bus processing for rock music might include:
-
- Compression: To add punch and sustain to drums and guitars, and to tighten up the mix.
- EQ: To emphasize the low-mid frequencies for added warmth and presence, and to balance the high frequencies for a clear, powerful sound.
- Saturation: To add subtle harmonic distortion for a more “analog” and warm sound.
- Limiting: To ensure a competitive loudness level without sacrificing dynamics.
- Hip-Hop:
Hip-hop mixes usually prioritize groove, bass, and vocals. Mix bus processing for hip-hop often includes:
-
- Compression: To glue the mix together and emphasize the rhythm and groove.
- EQ: To enhance the low end (kick and bass) for a powerful and deep sound, while also adding clarity to the vocals.
- Multiband Compression: To control the dynamics of specific frequency ranges, such as taming an overpowering bass or smoothing out vocal sibilance.
- Limiting: To achieve a loud and impactful mix without distortion.
- Electronic/Dance:
Electronic and dance music often focuses on a clean and powerful sound with a strong rhythmic foundation. Mix bus processing for these genres typically includes:
-
- Compression: To glue the mix together and emphasize the rhythm of the drums and synths.
- EQ: To accentuate the low-end (kick and bass) for a powerful club sound, while also providing clarity and presence to the synths and other elements.
- Stereo Widening: To create a spacious and immersive listening experience.
- Limiting: To reach competitive increased loudness levels suitable for club playback.
- Jazz:
Jazz music prioritizes dynamics and a natural, organic sound. Mix bus processing for jazz often includes:
-
- Light Compression: To gently control the overall dynamics without altering the natural performance.
- EQ: To subtly shape the overall tonal balance, often with a focus on the midrange to emphasize the warmth and presence of the instruments.
- Saturation: To add subtle harmonic richness and warmth to the mix.
- Limiting: To maintain a reasonable loudness level, while preserving the dynamic range of the performance.
- Classical:
Classical music places a strong emphasis on preserving the natural dynamics and acoustics of the performance. Mix bus processing for classical music might include:
- Minimal Or No Compression: To maintain the natural dynamics of the performance.
- EQ: To gently shape the tonal balance, often with a focus on the midrange and high frequencies for added clarity and presence.
- Reverb: To enhance the sense of space and depth in the mix, recreating the ambience of a concert hall or performance space, if needed.
- Limiting: To protect against potential clipping, but with a conservative approach to ensure the dynamic range is preserved.
Keep in mind that these are just general guidelines for suitable mix bus processing in different types of music genres.
7. Common Mix Bus Processing Mistakes And How To Avoid Them
Mix bus processing mistakes can compromise the quality of your final mix. Let’s take a look at common mix bus processing mistakes and tips on how to avoid them:
Common Mix Bus Processing Mistakes And Solutions:
- Over-Compression:
Mistake: Applying excessive compression on the mix bus can squash the dynamics, resulting in a lifeless and fatiguing mix.
Solution: Use gentle compression settings, with a low ratio (around 1.5:1 to 2:1), slow attack, and fast release. Adjust the threshold to achieve only 1-3 dB of gain reduction. Avoid overcompressing individual tracks, as this can compound the problem. - Over-EQing:
Mistake: Using too much EQ on the mix bus can lead to an unnatural and unbalanced tonal profile.
Solution: Make tonal adjustments on individual tracks before resorting to mix bus EQ. Use broad, gentle EQ adjustments on the mix bus, focusing on the overall tonal balance rather than fixing specific issues. - Overusing Stereo Widening:
Mistake: Excessive stereo widening can result in a mix that sounds unnatural and collapses when played back in mono.
Solution: Use stereo widening sparingly and check the mix in mono to ensure it still sounds balanced and coherent. Consider using mid-side processing techniques to selectively widen specific elements of the mix. - Ignoring Gain Staging:
Mistake: Poor gain staging throughout the mixing process can lead to distortion, clipping, or an unbalanced mix when applying mix bus processing.
Solution: Pay attention to gain staging from the start of the mix. Ensure individual tracks are not too loud, and leave sufficient headroom on the mix bus (around -6 dB) to accommodate processing without clipping. - Relying On Mix Bus Processing To Fix A Poor Mix:
Mistake: Attempting to correct issues with the mix using mix bus processing can lead to a compromised or even unusable final product.
Solution: Address issues with individual tracks and their relationships during the mixing process. Use mix bus processing to enhance and polish an already solid mix, rather than as a crutch to fix problems. - Over-Limiting:
Mistake: Pushing a limiter too hard in pursuit of loudness can cause distortion and a loss of dynamics and dynamic range.
Solution: Use limiting to prevent clipping and achieve a competitive loudness level without sacrificing dynamics. Compare your mix to reference tracks within your genre to ensure you are not over-limiting. - Not Referencing Other Mixes:
Mistake: Mixing in isolation can lead to a mix that doesn’t translate well across different listening environments and systems.
Solution: Reference your mix against professionally mixed tracks within your genre. Listen to your mix on various playback systems (headphones, car stereo, etc.) to ensure it translates well. - Inconsistency In Monitoring Levels:
Mistake: Mixing at different listening volumes can result in an unbalanced mix that sounds too bass-heavy or too bright.
Solution: Establish a consistent monitoring level while mixing, and use a sound level meter to measure and maintain the volume. Periodically check your mix at different volume levels to ensure it still sounds balanced.
Always be aware of these common mix bus processing mistakes (any engineer has made at some point) and follow the suggested solutions. This way, you can achieve a more polished and balanced mix that translates well across different listening environments.
8. Mastering And Its Relationship To Mix Bus Processing
Mix bus processing and mastering are related but distinct stages of audio production.
Mix bus processing focuses on creating a balanced, cohesive mix. Mastering comes afterward, aiming to optimize the mix for distribution and playback on various systems.
Mix bus processing should not replace proper mastering!
While both stages involve global processing on the stereo output, the goals, specific processes, and perspectives of mix bus processing and mastering are different.
Mix Bus And Mastering Relationship:
Goal:
Mix bus processing focuses on achieving a balanced and cohesive mix, with all elements working together harmoniously.
Mastering aims to optimize the final mix for distribution, ensuring consistency and quality across various playback systems.
Processing:
Mix bus processing typically includes gentle compression, EQ, stereo widening, and sometimes saturation or harmonic enhancement. These processes are applied globally to the entire mix to create a sense of cohesion.
Mastering involves more precise and targeted processing, such as multiband compression, surgical EQ, advanced stereo imaging, loudness standard limiting, and dithering.
Perspective:
During mixing, the engineer is deeply involved in the individual elements of the mix, making decisions about levels, panning, EQ, and other processing. Mix bus processing is an extension of this process, addressing the mix as a whole.
In mastering, the engineer brings a fresh, objective perspective to the mix, focusing on the overall sound and ensuring it translates well across different listening environments and formats.
Loudness:
Mix bus processing usually includes a limiter to protect against clipping and achieve a reasonable loudness level. However, the primary focus is on the balance and cohesion of the mix, rather than maximizing loudness.
In mastering, the engineer will use a more sophisticated limiter or maximizer to achieve competitive loudness levels without sacrificing dynamics or introducing distortion.
9. The Mix Bus: Achieve Your Own Desired Sound
In conclusion, mix bus processing is a crucial aspect of audio mixing that helps shape the overall tonal balance, cohesion, and dynamics of your mix right from the start.
By applying techniques such as gentle compression, EQ, stereo widening, and limiting, you can achieve a polished and professional sound that translates well across various listening environments.
As you gain experience and develop your unique mixing style, we encourage you to experiment with different processing techniques and create your own custom mix bus processing chain.
By doing so, you’ll not only enhance your mixes but also develop a deeper understanding of the art and craft of audio production.
Embrace the journey and enjoy the process of refining your mix bus processing skills to create compelling, impactful, and memorable music.

