Almost every artist wants the same mastering outcome: “Big, loud, full and of course: more open and wide! Let’s discuss how to achieve a better stereo width in mastering.
Achieving stereo width in audio mastering is an objective a mastering engineer often pursues. Enhancing the stereo image of a mix while maintaining its sonic balance is a challenging task. The stereo width of a mix can be altered through several specific audio processing techniques.
Learn more about how to specifically enhance the stereo image in your audio masters. This is a follow up guide on our article Stereo Widening In Mastering | More Width And Depth, which we highly recommend reading first.
Table Of Contents
1. The Correct Setup For Stereo Listening
2. Analyzing The Mix Before Making Changes To Its Stereo Image
3. Decision Making On Altering The Stereo Width In Mastering
4. How To Use A Stereo Imager Plugin To Enhance Stereo Width
5. How To Use Mid-Side EQ Processing To Enhance Stereo Width
6. Assessing Stereo Image Changes In Mastering

1. The Correct Setup For Stereo Listening
The environment in which we make audio processing decisions and the playback system play a crucial role, especially in mastering. It is necessary to optimize your room and to position your studio monitors correctly.
In general, when talking about making processing decisions affecting the stereo image of a track, it is recommended to work with studio speakers, rather than listening on headphones.
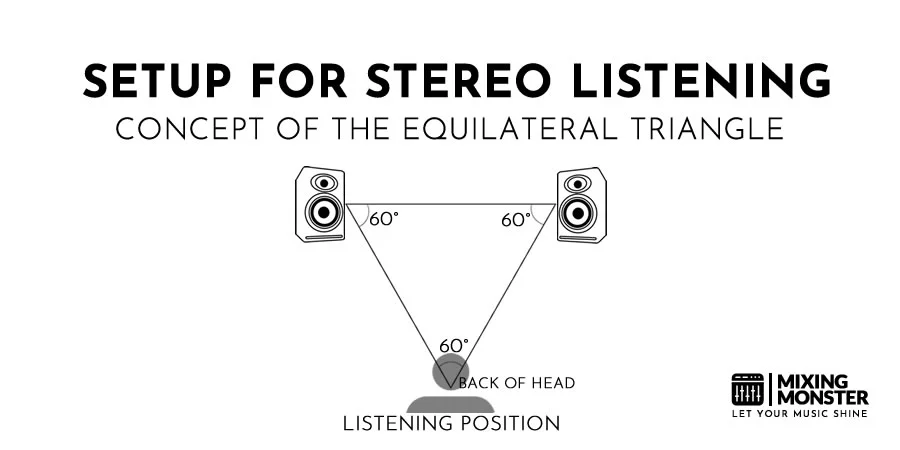
You should be familiar with the concept of the equilateral position for speakers. This means you should position your studio monitors in a way which allows for an even distribution of energy across the stereo field.
The best chance to achieve this is by making sure the distance between the monitors and the distance between each monitor and your listening position is the same. This configuration leads to an equilateral triangle.
By setting up your monitors and your listening position this way, you drastically increase your chances of making correct processing decisions regarding the stereo image of a track.
The second aspect to be aware of when listening back to audio is the room, which is always part of the listening environment and always affects the sound when working with studio speakers.
Watch out for reflective surfaces (blank walls, windows etc.) which can alter the perceived sound and lead to wrong decisions regarding the stereo image. There is a reason why mastering is performed in perfectly treated studios. But in case you work in a home studio, just make sure to optimize your room the best you can.
2. Analyzing The Mix Before Making Changes To Its Stereo Image
After making sure you find yourself in the best possible listening environment, the next logical step is to analyse the mix you are working with concerning its stereo information.
In the mixing phase, the mixing engineer already created his musical idea of the desired stereo image, width and depth of the song. The task of the mastering engineer is to pick up on this idea, “polish” and maybe enhance it.
In order to do so, it is necessary to become aware of how elements are positioned in the stereo field, how instruments and vocals are panned and what the most important components of the song are.
Analysing A Stereo Mix:
- Listen To The Song In Stereo:
While listening to the whole song in stereo, make sure you clearly identify the positioning of all sonic elements. You need to remember the initial stereo balance later on. - Listen To The Song In Mid-Side Mode:
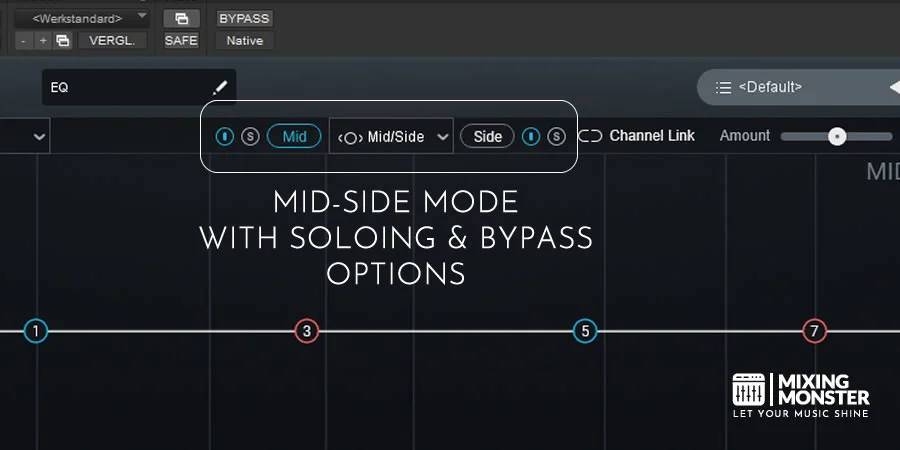
Grab a plugin of your choice, that is able to be operated in mid-side mode and allows you to solo each option. For example you could use an equalizer plugin like iZotopes Ozone EQ.
Start with soloing the mid (= listening in mono), then switch to soloing the side information (panned signal).
This way you get a feel for the balance of the mono signal vs. the side signal, what instruments are showing up frequently in the stereo field, which elements are positioned more towards the center and which parts are living right in the center (mono).
The information you are gathering about the stereo balance become your baseline for the following decision making. You need to know and remember this initial balance when intending to alter it.
3. Decision Making On Altering The Stereo Width In Mastering
So far you listened to the mix in an controlled environment in full stereo, in mono and in mid-side mode and got a clear overview of the stereo balance of the song. It is now time to think about the changes you want to make to the stereo image of the track.
Decision Making On Altering The Stereo Width In Mastering:
- Does The Stereo Image Need Changes At All?
- Which Problems Can Occur When Processing The Stereo Image?
- Why Needs The Stereo Image To Be Changed?
- What Is The Specific Goal Of Altering The Stereo Image?
You should always be aware of the fact, that possible improvements in processing the stereo width always come with trade-offs. For example, increasing some high frequency content on the sides may lead to a lack of warmth in the centered vocal.
In general, the task regarding processing the stereo width of a track is enhancing the initial musical idea. Creating a whole new “feel of depth and width” or drastically changing the stereo image should be avoided!
After analysing the mix, imagine what stereo imaging would do to the initial stereo balance you discovered. How might the mix change, what could be enhanced and what might get attenuated or even lost?
Additional Aspects To Consider:
Increasing the stereo width often leads to balance changes, as the panned signal is getting more prominent (e.g. reverb information). Make sure to not drastically change the balance of certain elements or even the whole mix (center – side – balance) by changing or raising the side signal in an unpleasing way.
Mid frequency range changes should be handled with care, as a lot of important elements are competing in this area and it is often the most noticeable area. High frequency range changes are let’s say a little “more forgiving”.
When thinking about low end content and stereo imaging, there are some crucial points to consider. As a general rule of thumb, stereo widening low frequency content can be dangerous, as this often leads to an uneven distribution of energy between the left and the right channel. This is why the bass of a track usually is positioned to the very center.
A question that often occurs at this point is “should i go ahead and make the bass more mono, maybe fully reducing its stereo width?
A good mix already has a good centered low end balance and might not need what many people often refer to as “tightening” the low end by monoizing it. But some elements might benefit from being “pulled to the center” by a certain degree:
Make your decision regarding monoizing low frequency content after mid side listening – does the side signal contain substantial low end information (e.g. low end of guitars, vocals or synths) which should maybe be “more mono”?
Last but not least: Always keep mono compatibility in mind!
4. How To Use A Stereo Imager Plugin To Enhance Stereo Width
Let’s get down to actually processing the stereo width in mastering. In section 4 and 5 we will present our go to solutions when enhancing stereo width in mastering. We recommend combining both: a subtle use of a stereo imager plugin (4) with mid-side EQ processing (5).
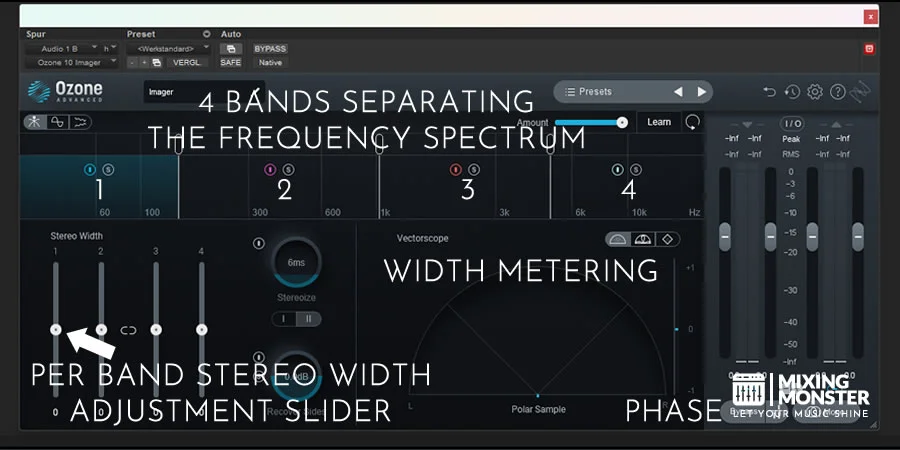
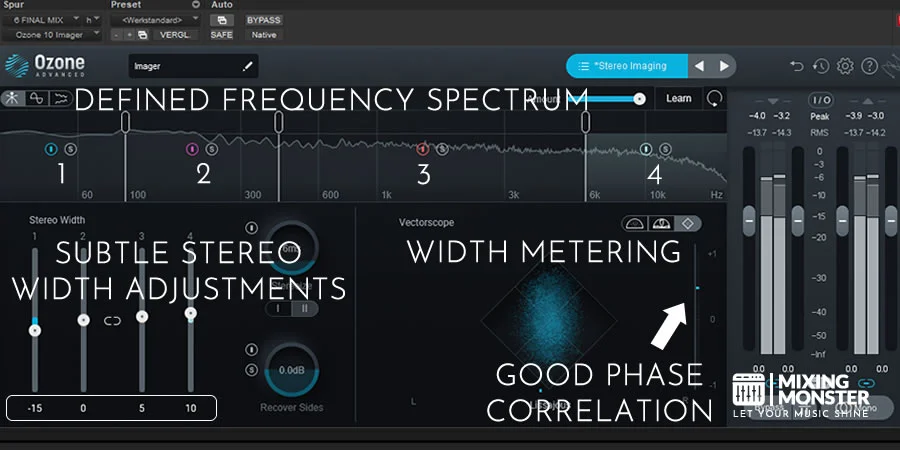
Our clear recommendation here is the Ozone Imager plugin by iZotope. It is a mid-side tool which allows to make changes to the stereo width of a track. Often used in multiband mode, it can meticulously process the whole frequency spectrum of a track.
On average there are two options putting this plugin in the signal chain, depending on how much you want to process the stereo image: right at the beginning or near the end before the limiter.
How To Use A Stereo Imager Plugin:
- Divide The Frequency Spectrum:
Start by dividing the frequency spectrum into 4 separate bands, representing the different frequency areas in your track. You should already have an idea which elements of the track should show up the most in each band after analysing the track in mid-side. Feel free to disable any unnecessary bands you do not want to make changes to. - Define The Crossover Points Of Each Band:
Solo each band separately while playing back your track and make a decision where to strategically place the exact crossover point of each band separator. In case you have no clue at all, you could make use of the “learn button”, which analyses your track and sets the crossover points automatically (always redefine these manually afterwards). - Identify Which Elements Of The Track Are Audible In Each Band:
Before making any changes, make sure you analyse exactly which frequency parts of each musical element of the track are audible in each band by again soloing each band. Remember: you are listening to defined frequency areas now rather than to mid-side information (which could contain any frequencies). - Make Adjustments To The Stereo Width:
Remember the things we discussed in section 3 regarding frequencies and start making adjustments by moving each band adjustment slider up (more stereo width in that band) or down (vice versa). Be very cautious while moving the sliders! As a general rule of thumb: high frequency bands allow for more stereo width than low frequency bands. - Analyse The Stereo Image Changes By Metering The Width:
The Ozone Imager plugin comes with an integrated so called “Vectorscope” which allows you to meter the changes you made to the stereo image. It is crucial to monitor any changes in order to avoid common sonic issues when altering stereo width. Metering width in mastering will be explained in section 6. - Perform An A/B Comparison: Unprocessed vs. Stereo Enhanced Signal:
Playback your track while bypassing and enabling the imager plugin, back and forth. What got better, what got worse, what maybe got lost in the stereo enhanced signal? Did the changes lead to the desired stereo image while not doing to much “harm”? Make adjustments accordingly!

5. How To Use Mid-Side EQ Processing To Enhance Stereo Width
We already discussed working in mid-side mode in section 2, but now we are not using it to analyse and monitor the characteristics of the stereo image, we are utilizing it to process different fequencies in the stereo field.
By using an equalizier in mid-side mode, we are adjusting the difference between the mono and the panned signal in a way that tries to enhance the perception of width and depth by subtly accentuating certain frequency areas.
Mid-side EQ processing can be applied in conjuntion with a stereo imager plugin or by itself. The order in the processing chain is up to taste.
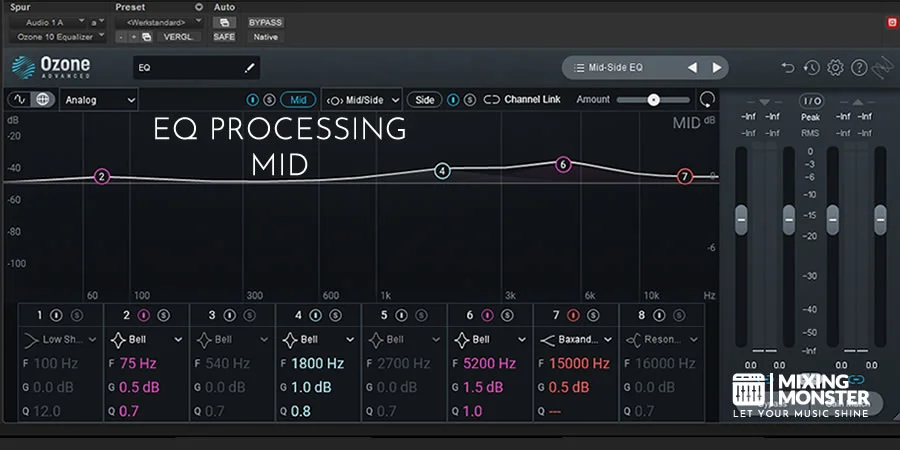
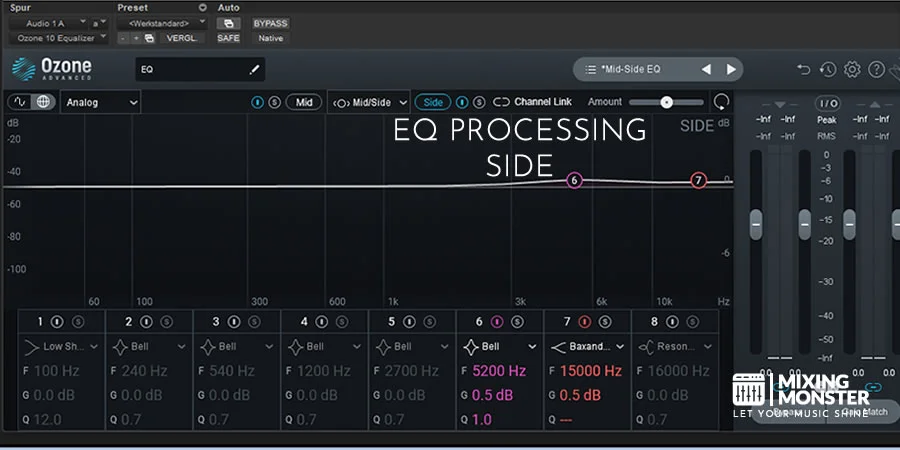
The settings in this example are by no means applicable to any audio track. They should be seen as a basic starting point and adjustments are always depending on the initial mix. Be aware of the fact that we are talking about changes in the 0,5 to 1,5 dB range with a Q around 1, which are intentionally very subtle!
How To Use Mid-Side EQ Processing To Enhance The Stereo Image:
Mid EQ Processing:
- Emphazise The Low End
Depending on the overall bass balance, a slight boost in the 60-80 Hz may “embrace” the low end. - Define The Mids In The Center
Slight boosts in the 1,8 kHz and the 5 kHz region can increase clarity and separation, especially in centered vocal sections and instrument parts.
Side EQ Processing:
- Mirror Your Mid Boost
In order to keep the overall tonal balance, very slightly boost around 4-5 kHz, around 0,5 dB. - Polish The High Frequency Area
Experiment with raising the 15 kHz area by a tiny bit. Be careful, as the side information may already be very bright. Make sure this adjustment leads to more clarity and perceived width. Otherwise, leave it out.
6. Assessing Stereo Image Changes In Mastering
Hopefully your endeavours in stereo widening lead to the desired “more open & wide” result. But before bouncing down your track, you need to assure you did no harm to the balance and the phase correlation of the mix.
Are instruments disappearing or changing in volume when switching from stereo to mono and vice versa? This might be an indication for phase cancellation or too drastic stereo width adjustments.
In addition to this, check if the track maybe lost some impact because low end information got spread out too much in the stereo field, which may lead to an uneven distribution of energy between the stereo channels.
Last but not least: meter and monitor the changes you made to the stereo image.
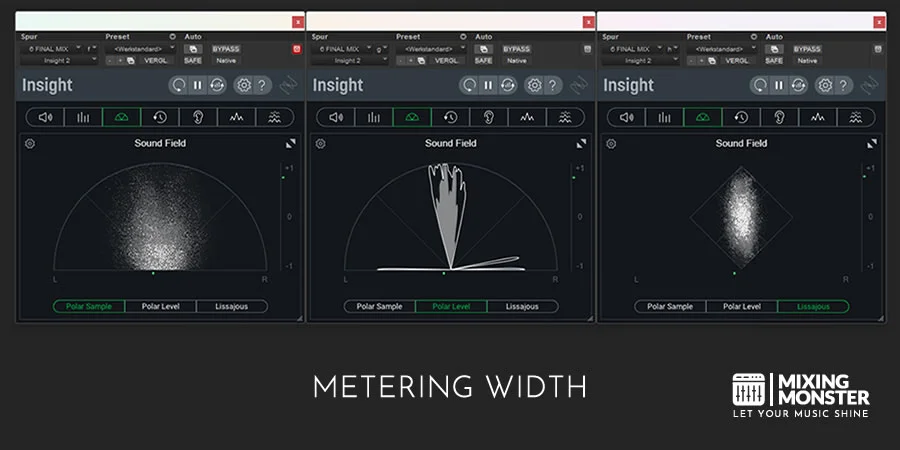
Metering Width:
The already mentionend vectorscope lets you see the difference between the mono and the stereo component of a signal.
A more vertical orientation means the signal is more mono (e.g. kick beats) and a more horizontally orientation indicates a more stereo / panned signal (e.g. panned guitars).
Do you see more stereo than mono information? This might be a sign you processed the stereo image too much and a lack of center (mono) information occurs.
Metering Phase Correlation:
Always check the integrity of the phase correlation after stereo widening / processing your track!
The vectorscope comes with a phase correlation meter for a reason, which indicates the following:
0: equal energy across left, right and center, the signal is neither in phase, nor out of phase
+1: purely mono signal (totally in phase)
-1: purely side signal (totally phase incoherent)
The phase correlation indicator should appear in the 0 to +1 region for most of the time. Constant values between 0 and -1 are a sign for some sort of phase issues.
After checking mono compatibility and making sure no phase issues occured, your stereo widened master is good to go!
Learn more about stereo widening in mastering by also reading our article Stereo Widening In Mastering | More Width And Depth.

