Home > Blog > Mixing > Mixing Techniques
Affiliate Disclaimer: We may earn a commission if you purchase through our links
Unlock the secrets of sonic perfection as we delve into the art and science of how to EQ in audio mixing. From the smooth contours of jazz to the high-octane beats of EDM, our guide on expert sound equalization is your key to crafting flawless audio landscapes. Get ready to fine-tune your skills and amplify your sound to new heights as we break down the EQing process, note by note.
Learning how to EQ, or equalize, involves adjusting the balance of different frequency components in an audio signal. It’s a crucial part of audio mixing that refines sound quality and clarity. Comprehensive knowledge in this domain enhances the control over your audio, promising a more balanced output.
Did you know that mastering how to EQ can transform your audio from ordinary to extraordinary? Immerse yourself in the art and science of equalization and unveil the secret to a perfect sonic balance. Let the symphony begin!
Table Of Contents
1. Understanding The Basics Of EQ And Audio Mixing
2. Different Types Of EQs
3. How To Use EQ In Audio Mixing
4. Best Practices In Audio Equalization
5. Advanced EQ Techniques For Audio Mixing
6. Common EQ Pitfalls And How To Avoid Them
7. EQ Software And Hardware
8. Mastering EQ For Superior Sound: The Final Note
9. FAQ

1. Understanding The Basics Of EQ And Audio Mixing
What Is An Equalizer In Audio Processing?
When learning how to EQ, one must start with understanding what an equalizer in audio processing is.
An Equalizer, often shortened to EQ, is a tool used in audio engineering to adjust specific frequency bands within an audio signal. This tool can drastically alter the character and quality of a sound.
Definition And Importance Of EQ In Audio Mixing
EQ in audio mixing is a vital process that enhances the balance and blend of the frequencies in a mix. Equalization, as the term suggests, equalizes or balances the tonal aspects of different sounds in a mix.
It helps eliminate unwanted frequencies, boost needed frequencies, and create space for each element in the mix. A well-equalized audio track can vastly improve clarity, eliminate muddiness, and deliver a more pleasing sonic experience to the listener.
Key Terminology To Understand In EQ
When diving into how to EQ, there’s specific terminology you need to know:
- Frequency:
The speed of vibration of the sound waves; it determines the pitch of the sound. It’s measured in Hertz (Hz). - Band:
A specific range of frequencies. When you adjust a ‘band’ in EQ, you’re changing that range of frequencies. - Decibel (dB):
The unit of measurement for audio volume. - Low-Pass Filter:
An EQ tool that allows frequencies below a certain point to pass and cuts off frequencies above it. - High-Pass Filter:
The opposite of the Low-Pass Filter, it allows frequencies above a certain point to pass and cuts off those below it. - Peak/EQ Band:
A bell-shaped band that boosts or cuts frequencies around a certain point. - Q Factor:
Refers to the width of the EQ Band.
Understanding these terms will make navigating the rest of this guide and any equalization task much more manageable!
Any additional questions regarding terminology? You’ll find the most comprehensive audio mixing terminology list on the net here:
Stay tuned as we look deeper into the different types of EQs in the next section.
2. Different Types Of EQs
Graphic Equalizers
So, how to EQ with a Graphic Equalizer? This type of equalizer is the most visually intuitive of all the EQ types.
Graphic equalizers divide the frequency range into bands you can boost or cut individually, each representing a specific range of frequencies. The changes you make are reflected in the graphic representation, allowing you to see the “shape” of your adjustments.
Parametric Equalizers
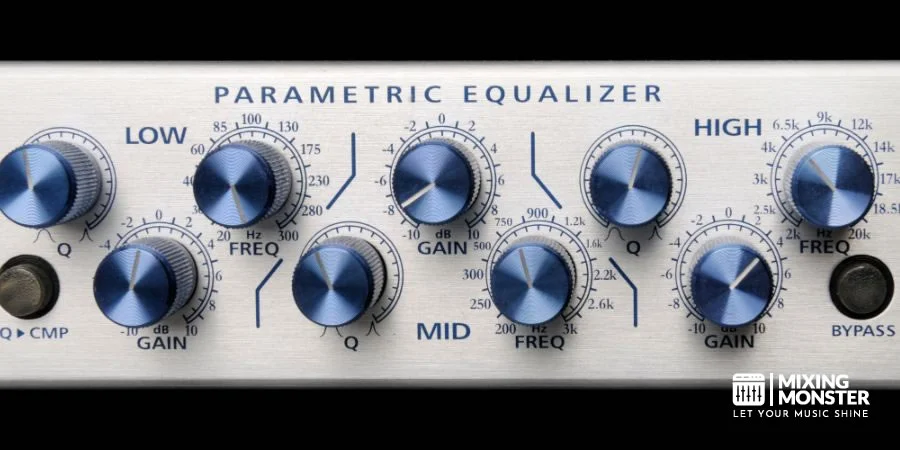
Parametric equalizers offer much more flexibility and control, making them a preferred choice for many audio professionals. A parametric EQ allows you to adjust the ‘Q’ factor, altering the width of the bands you’re affecting.
This means you can target specific problem frequencies without affecting those around it, giving you the precision needed for complex audio mixing tasks.
Semi-Parametric Equalizers
A semi-parametric equalizer, sometimes known as a sweepable EQ, strikes a balance between the other two types. It allows you to adjust the frequency and the gain like a parametric EQ, but it doesn’t give control over the Q factor. This makes it simpler yet versatile enough for most common EQ tasks.
Digital Vs. Analog Equalizers
There are two main categories of equalizers: digital and analog.
Digital EQs are typically software-based and provide a visual representation of the frequencies you’re working with, which can help understand how your changes affect the sound. They’re perfect for precision, offering more bands and more flexibility.
Analog EQs, on the other hand, are hardware devices used in live sound or recording environments. They’re prized for their warmth and musicality. Their tactile controls can lead to a more intuitive and creative EQ process, though they might lack the surgical precision of their digital counterparts.
To sum up, both digital and analog EQs have pros and cons, and the choice between them will largely depend on the specific requirements of your project and personal preference.
Keep reading as we venture into the application of EQ in audio mixing in the next section.
3. How To Use EQ In Audio Mixing
Where To Place An Equalizer In The Signal Chain?
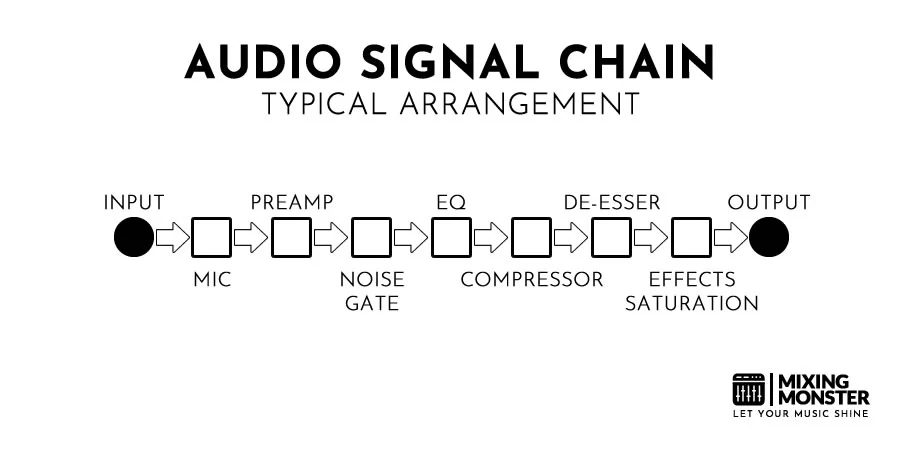
The placement of an equalizer in your signal chain can significantly influence the sound of your final mix. Ideally, the EQ sits after the initial dynamics processing, like compressors or noise gates.
However, it might sometimes be beneficial to place EQ before compression, especially when mixing or mastering audio.
For example, if you’re working with a vocal track, your signal chain might look like this:
Microphone -> Preamp -> Noise Gate -> Compressor -> Equalizer -> De-Esser -> Effects (like reverb, delay) -> Output.
Depending on the creative needs of your project, you may change this order.
How To Use An Equalizer
To use an equalizer effectively, you must be well-versed in the frequency spectrum of the audio you’re working with. Here’s a more detailed look:
- Sub-Bass (20 – 60 Hz):
These frequencies are where the rumble and power in your music live. For instance, in a dance music track, you can slightly boost around 50 Hz to add more ‘thump’ to the kick drum. Remember, too much boosting in this range can lead to a boomy or muddy mix. - Bass (60 – 250 Hz):
This range carries your mix’s main ‘bass’ elements. You should slightly cut around 200 Hz on some instruments to avoid a boomy mix. - Low Mids (250 – 2000 Hz):
Many instruments have their ‘body’ in this range. For instance, try a gentle boost around 500 Hz if your guitar sounds a bit thin. - High Mids (2000 – 4000 Hz):
This is where the ‘presence’ of your audio lives. If your vocal track seems buried, try boosting around 3 kHz. - Treble (4000 – 20000 Hz):
This range gives ‘brightness’ to your mix. A gentle boost of around 8 kHz can make your mix sound more ‘open.’
EQ Boosting Vs. Cutting
Equalization is all about balance. It’s about knowing when to boost (add) and when to cut (subtract) frequencies. Though both are essential tools in your mixing arsenal, they serve different purposes, and their overuse can have other consequences.
Boosting EQ is a great way to emphasize the pleasing aspects of a sound. It can bring out the vibrancy in a vocal, the guitar’s brightness, or the drum’s punch.
However, too much boosting can lead to an over-saturated mix, causing specific frequencies to overpower others and degrade the overall sound quality. For instance, over-boosting high frequencies can make your mix sound harsh or piercing.
Cutting EQ, on the other hand, is commonly used to eliminate troublesome frequencies that are muddying up your mix or causing specific instruments to clash. Cutting gives more room for other elements in the mix to breathe. Overdoing it might make your mix sound thin or hollow.
It’s important to remember that boosting and cutting should be done judiciously and in moderation. Subtle adjustments often lead to a more balanced mix.
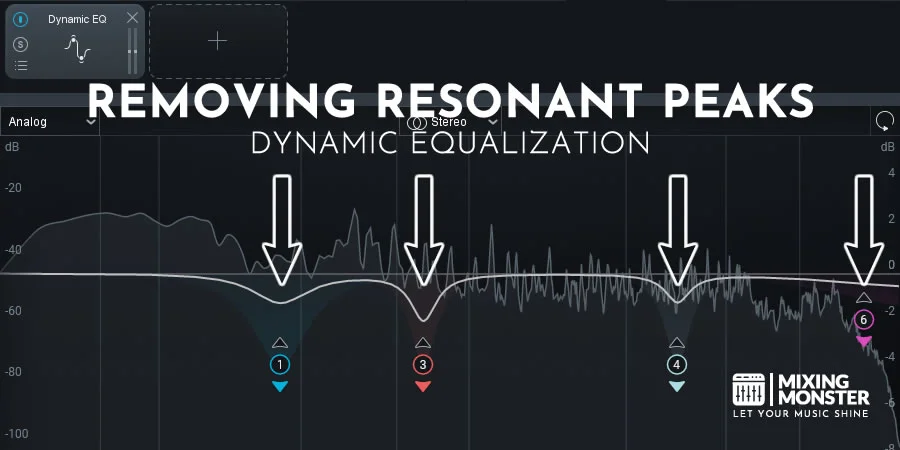
At this point, you might also be interested in reading this article about resonant peaks:
Identifying Frequencies And Bands For EQ
Identifying frequencies and bands for EQ is an art form. Every sound is made up of a complex mixture of frequencies. Identifying and manipulating these frequencies is the key to a great mix.
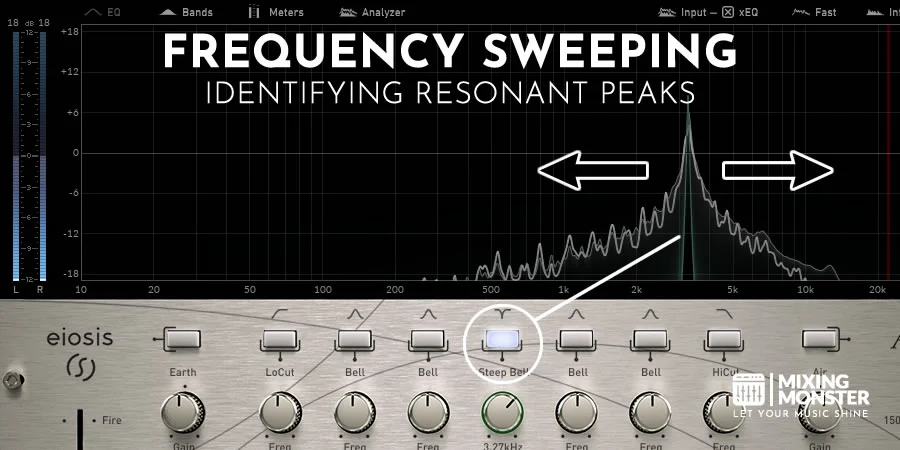
Start by listening carefully to the sound you want to EQ. Use a spectrum analyzer to identify peaks and troughs in the frequency spectrum visually.
Sweeping a boosted EQ band across the frequency range can help you locate troublesome frequencies – often the ones that sound unpleasant when boosted.
Specific instruments often occupy particular frequency ranges. For instance, the human voice typically resides in the 300 Hz to 3.5 kHz range, whereas a kick drum might have fundamental frequencies between 40 Hz and 200 Hz.
Knowing the typical frequency ranges of the instruments in your mix can give you a good starting point for your EQ adjustments.
Techniques For Adjusting EQ Bands
When adjusting EQ bands, it’s essential to be precise and intentional. Here are a few techniques that can guide your EQ adjustments:
- Cut Narrow, Boost Wide:
When cutting frequencies, it’s often best to use a narrow Q, which affects a smaller range of frequencies. This allows you to hone in on and reduce troublesome frequencies without drastically altering the surrounding ones. When boosting frequencies, use a wider Q for a more natural sound. - Subtractive EQ Before Additive EQ:
Always start with subtractive EQ (cutting) before moving on to additive EQ (boosting). Removing the problematic frequencies first makes the sound better without boosting. - High-Pass And Low-Pass Filters:
These filters are handy for removing unnecessary frequencies. A high-pass filter cuts off frequencies below a certain point, allowing higher frequencies to pass through. This is great for eliminating low-end rumble. A low-pass filter does the opposite, cutting off high frequencies and allowing low ones to pass. This is useful for reducing hiss or excessive brightness. - Avoid Extreme EQ Moves:
Extreme cuts or boosts can make your mix sound unnatural. Generally, if you have to make extreme EQ adjustments, it’s worth considering whether there’s a problem at the source.
Remember, the goal of EQ is to serve the song, not to showcase your EQ skills!
Sometimes the best EQ move is the one you don’t make. Be patient, be attentive, and always trust your ears.
4. Best Practices In Audio Equalization
Practical Guidelines For Using EQ
Equalization is one of the most potent tools in audio production. Misuse, however, can lead to undesirable results. Again, here are some general guidelines for using EQ which cannot be overstated:
- Always EQ In Context:
Decisions should be made while listening to the entire mix, not just the individual track. - Avoid Extreme Boosts And Cuts: Overly aggressive EQing can lead to an unnatural-sounding mix.
- Use High And Low-Pass Filters:
These filters can remove unnecessary frequencies and clean up your mix. - Trust Your Ears:
Visual tools can be helpful, but always trust what you hear over what you see.
Recommendations For Equalizing Different Instruments
Different instruments have different frequency ranges and characteristics. An expanded table provides general recommendations on how to EQ some standard instruments.
Please note these are starting points, and the perfect EQ settings will depend on your song’s specific mix and creative direction.
| Instrument | Frequency Range | EQ Tips |
| Kick Drum | 0 – 100 Hz (Fundamental), 2 – 4 kHz (Attack) | Boost around 60 Hz for more ‘thump,’ cut around 250 – 400 Hz to reduce muddiness, and boost around 3 kHz for more ‘click.’ |
| Snare | 120 – 240 Hz (Body), 2 – 4 kHz (Attack) | Boost around 200 Hz for more body, cut roughly 1 kHz to reduce ‘boxiness,’ boost about 4 kHz for more snap. |
| Toms | 60 – 240 Hz (Body), 3 – 5 kHz (Attack) | Cut around 400 Hz to remove ‘boxiness,’ boost around 5 kHz for more attack |
| Hi-Hat | 250 Hz – 6 kHz (Body), >6 kHz (Shimmer) | Cut below 200 Hz and above 12 kHz, boost around 6 kHz for more presence |
| Drum Overheads | 20 Hz – 20 kHz | High-pass filter at 40 Hz, boost around 10 kHz for more shimmer |
| Bass Guitar | 60 – 250 Hz (Fundamental), 700 Hz – 2.5 kHz (Overtones) | Boost around 100 Hz for more body, cut about 300 Hz to reduce muddiness, boost about 800 Hz for more growl |
| Acoustic Guitar | 80 – 240 Hz (Body), 2.5 – 5 kHz (Presence) | Cut around 200 Hz to reduce muddiness, and boost about 3 kHz for clarity. |
| Electric Guitar | 80 – 1.2 kHz (Body), 3 – 6 kHz (Presence) | Cut around 1 kHz to remove harshness, and boost about 3 kHz for more presence. |
| Synthesizers | Wide range, dependent on patch | Be careful with low-end, avoid masking other instruments |
| Vocals | 100 – 300 Hz (Body), 2 – 4 kHz (Presence), 4 – 9 kHz (Brightness) | Cut around 200 Hz to reduce muddiness, boost around 3 kHz for more presence, and raise about 6 kHz for more airiness |
| Background Vocals | Similar to lead vocals, but typically less low-end | High-pass filter at 200 Hz, cut around 5 kHz to prevent overshadowing lead vocals |
EQ Techniques For Bus Mixing
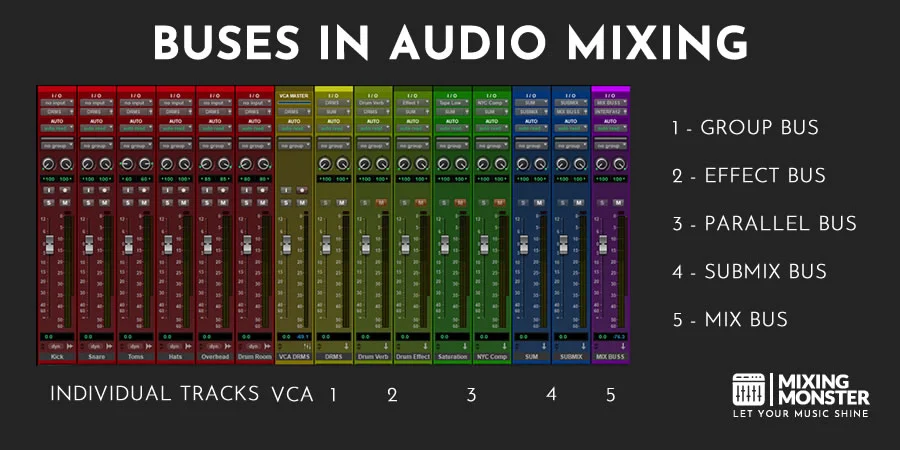
Bus mixing is an effective strategy for creating a cohesive sound across multiple tracks. It involves grouping similar tracks, like all drum tracks or all vocal tracks, and applying equalization to them as a unit.
This process is beneficial in multiple ways. Firstly, it helps ensure consistency in the sonic character of related sounds. Secondly, it can significantly speed up your workflow by simultaneously applying changes to multiple tracks.
However, caution must be used to avoid over-EQing your bus groups, leading to an over-processed sound.
To practice this:
- Start by grouping related tracks, such as all drum microphones or all backing vocals.
- Listen carefully to the group and make EQ adjustments that benefit the overall sound.
- Always remember to periodically bypass your EQ to make sure your changes are improving the sound.
- Try altering your entire mix trough mix bus processing.
Best Settings For Equalization In Various Genres
The “perfect” EQ settings can significantly vary depending on the genre of music. Different genres have unique sonic characteristics that should guide your EQ decisions.
For instance, in rock music, you might find a heavier emphasis on the low-end (bass drum, bass guitar) and a more pronounced high-mid range (electric guitars, vocals). Conversely, a jazz mix might benefit from a more balanced, natural sound that respects the unique timbre of each instrument.
In electronic music genres, synths and bass elements often dominate the lower frequencies, while percussive electronic sounds occupy the higher frequency ranges.
Always consider the specific needs of the genre you’re working with, and remember that the ultimate goal is to serve the song.
Benefits Of Using EQ In Mono Vs. Stereo
Checking your mix in mono and stereo is an essential aspect of EQing. Some EQ decisions that sound great in stereo can cause phase issues when summed to mono.
Stereo EQing is excellent for creating a broad and immersive sound field, particularly useful in genres like ambient, orchestral, or any other style where a sense of space is essential. It can create a sense of depth and space, providing a richer listening experience.
Mono EQing, on the other hand, can ensure that your mix sounds good on mono systems, such as smartphone speakers or PA systems in clubs and bars. It’s also a great way to check for phase issues in your mix. If something sounds good in mono, it’ll sound good in stereo.
Therefore, switching between mono and stereo is recommended when making EQ decisions.
A mix that sounds good in mono and stereo will translate well on any system!

5. Advanced EQ Techniques For Audio Mixing
Using Dynamic EQ In Audio Mixing
A dynamic EQ works similarly to a standard EQ, with one significant difference – its EQ bands are dynamic. The band’s gain can change in response to the input level.
For example, you can set a dynamic EQ only to cut frequencies when they become too loud, preventing them from overpowering the mix without unnecessarily removing them when their level is acceptable.
One common application of dynamic EQ is controlling harshness in vocals. Harshness typically resides in the 2- to 4 kHz range but is often only problematic on certain words or phrases.
With dynamic EQ, you can set the EQ to reduce these frequencies only when they become overly harsh. This allows you to control the harshness without negatively affecting the times when those frequencies are balanced.
Using EQ And Side-Chaining In Audio Mixing
Side-chaining with EQ is an advanced technique useful in various scenarios. It involves using one track’s output to shape another’s EQ curve.
For example, consider a mix with a prominent kick drum and a bass guitar. These two elements often compete for space in the lower frequencies, leading to a muddy mix.
One solution and classical example to this problem: using a dynamic EQ on the bass track, which is side-chained to the kick drum. This allows the bass to duck in volume at the specific frequencies of the kick drum every time the kick drum hits, creating room for the kick without unnecessarily reducing the volume of the bass at other times.
By carefully applying these advanced EQ techniques, you can take your mixes to the next level, creating a transparent and balanced sound that matches professional productions.
6. Common EQ Pitfalls And How To Avoid Them
Over-EQing: Causes And Solutions
It’s not uncommon for beginners to get carried away with EQ. While EQ is handy, overusing it can lead to an unnatural, over-processed sound. This can occur when too many frequencies are boosted or cut, or EQ adjustments are too extreme.
The best way to avoid over-EQing is to always listen to your changes in the context of the whole mix. It can be tempting to solo a track and apply EQ, but this can lead to decisions that don’t work well when all the tracks are playing together.
Instead, make your EQ decisions based on how each track interacts with the whole mix. Also, always strive for subtlety in your EQ adjustments. Minor cuts and boosts across multiple tracks are often more effective than a few significant changes on a single track.
Phase Issues From EQing And How To Resolve Them
Phase issues can be a byproduct of EQing, mainly when using analog-modeled EQs or when applying EQ to stereo tracks. Phase issues can cause specific frequencies to cancel each other out, leading to a thin, weak sound.
To avoid this, it’s important to always check your mix in mono and stereo. You may have phase issues if your mix sounds full in stereo but thin in mono. Many DAWs and EQ plugins offer phase correction features that can help to mitigate this problem.
Additionally, it can be helpful to use a linear phase EQ when EQing stereo tracks, as these EQs are designed to avoid creating phase issues.
Remember, EQ is a tool to help you shape your mix, not a solution to all problems. Always start with a sound recording and use EQ to enhance and balance, not to try and ‘fix’ a poorly recorded track.
Want to learn more about audio phase? Check this out:
7. EQ Software And Hardware
EQ Software
EQ software plays a crucial role in modern audio mixing, offering a range of options for precision frequency adjustments. Today’s market has diverse software solutions featuring unique characteristics and tools.
Here are some top-rated EQ software options and their key features:
- FabFilter’s Pro-Q 3:
This software is highly acclaimed for its versatile and intuitive interface. It offers dynamic EQ, surround support, and per-band mid/side processing. - iZotope’s Ozone EQ:
Renowned for its spectral shaping capabilities, this software provides a wealth of advanced features, including an eight-band EQ, a real-time analyzer, and a variety of filters. - Waves’ Q10:
Celebrated for its precision, this ten-band EQ software offers a range of filter types and a detailed frequency response display.
Remember, each software offers unique features and benefits, so choosing one depends on your needs, workflow preferences, and budget.
EQ Hardware
While software solutions are increasingly dominant, many audio engineers still value EQ hardware’s unique sound characteristics and tactile experience. These devices offer a different engagement with the EQ process, often adding a unique warmth and musicality to the sound.
Here are some notable EQ hardware units and their standout features:
- Pultec EQP-1A:
This classic tube-based EQ offers unique tonal shaping capabilities and is especially loved for its ability to boost and cut the same frequency simultaneously, creating a resonant shelf. - SSL G-Equalizer:
This console EQ is known for its distinctive curve shapes and musical tonality. It’s particularly favored for adding sheen and clarity to the high end of a mix. - API 550A:
This discrete 3-band EQ offers repeatable settings via its proportional-Q design and is renowned for its warm analog sound.
As with software, it’s essential to consider your specific needs, the nature of your projects, and your budget before investing in EQ hardware. The right tool can add character and depth to your audio mixing, enhancing your overall music production value.
8. Mastering EQ For Superior Sound: The Final Note
Equalization is an essential tool in audio mixing. It’s a delicate process that requires a discerning ear, a solid understanding of sound frequencies, and proficiency with your chosen EQ tools.
Understanding how to EQ effectively can help you shape your mixes with precision and depth, carving out a unique sonic identity for each track.
Whether you’re just starting or are an experienced audio engineer, the journey to mastering EQ is a continuous learning process. So, never stop experimenting, trust your ears, and always serve the music.
Remember, it’s not about having the most expensive gear or the latest software – it’s about understanding how to use what you have to create the best possible sound.
Now that you’re armed with this wealth of knowledge about EQ in audio mixing, it’s time to apply these techniques to your projects!
Happy EQing!
9. FAQ
- What Is The Most Important Aspect Of EQ In Audio Mixing?
While there are many essential aspects to consider, one of the most crucial is always making EQ decisions in the context of the full mix. An EQ move that sounds good on a soloed track may not work well within the mix. Your goal with EQ should be to create a balanced, precise mix where each element has its own space. - How Do I Know When To Cut Or Boost Frequencies?
This largely depends on the context of the mix and what you’re trying to achieve. As a general rule, cutting frequencies can create space in a blend, helping to eliminate muddiness or harshness. Boosting frequencies can help emphasize the desirable characteristics of a track. Use your ears and make decisions based on what serves the song best. - What Is The Difference Between Parametric And Graphic EQ?
A parametric EQ allows you to adjust the frequency, Q (width of the cut/boost), and gain of each band, giving you more precise control. A graphic EQ, on the other hand, has fixed frequencies and Q values, and you can only adjust the gain. Each type of EQ has its uses depending on the situation. - Can Overuse Of EQ Damage My Audio Mix?
Overuse of EQ can lead to an unnatural, over-processed sound. It can also introduce phase issues, primarily when used on stereo tracks. Use EQ judiciously and always in the context of the whole mix. - How Do I Choose The Right EQ Software For Me?
Consider your budget, the features you need, the genres you typically work in, and your workflow. Most EQ software offers a free trial, so take advantage of this to see if it fits your needs and workflow. Remember, the best EQ is the one you know how to use effectively.

