Home > Blog > Mixing > Subcategory
Disclosure: Some of the links below are affiliate links, meaning that at no additional cost to you, we will receive a commission if you click through and make a purchase. Read our full affiliate disclosure here.
In audio engineering, parallel processing is a game-changer. Instead of replacing your original sound with heavy effects, this technique lets you blend a processed signal with the untouched one. The result? Punch, clarity, and depth — all while preserving the natural dynamics of your mix.
Audio parallel processing is a mixing technique where a duplicate signal is processed and blended with the original. By combining “wet” and “dry” tracks, engineers enhance punch, depth, and clarity while preserving dynamics, making it a key method in modern music production.
From parallel compression that makes drums hit harder, to parallel reverb that adds space without drowning vocals, the possibilities are nearly endless. Whether you’re working in a bedroom studio or a professional setup, mastering parallel processing is one of the fastest ways to elevate your mixes.
KEY TAKEAWAYS:
- Parallel processing lets you add punch, depth, and warmth while keeping your original sound intact.
- Balancing processed and unprocessed tracks gives clarity and flexibility across vocals, drums, and instruments.
- From parallel compression to reverb and saturation, this technique helps your mixes sound polished and professional.
Table Of Contents
1. Parallel Processing In Audio Engineering Explained
2. Essential Parallel Processing Techniques For Mixing
3. Tools And Plugins That Excel At Parallel Processing
4. Best Practices For Applying Parallel Processing
5. Advanced Parallel Audio Processing Techniques
6. Real-World Examples Of Parallel Processing In Music
7. Key Takeaways For Parallel Audio Processing
FAQ

1. Parallel Processing In Audio Engineering Explained
In audio engineering, parallel processing means you blend an untouched (dry) signal with a processed version. This gives you more control, clarity, and creative options. Engineers can dial in punch, depth, and tonal balance while still keeping the original’s natural vibe.
What Is Parallel Processing And Why It Matters
Here’s how it works: you split an audio signal so one path stays dry and the other gets effects (the wet path). Then you mix them back together. It’s not just slapping effects on and calling it a day—you actually preserve the original sound.
Engineers rely on this to maintain clarity while adding energy or texture. Think parallel compression: you can make stuff sound louder and fuller, but you don’t squash the life out of it. This is a lifesaver for drums, vocals, and even entire mixes where you want punch and detail.
It’s like a parallel algorithm in computing. Both sides—the dry and the wet—run together and solve the “problem” (making a killer mix) in a way you just can’t pull off with old-school, step-by-step processing.
The Difference Between Serial And Parallel Processing
With serial processing, you run effects one after another, and each one changes the signal before handing it off. It’s like a relay race: sequential, step by step.
Parallel processing runs two versions at the same time. The dry signal stays as-is, the wet path gets the treatment, and then you blend them. This lets you dial in the effect’s intensity without messing up the source forever.
A quick side-by-side:
| Approach | Signal Flow | Flexibility |
|---|---|---|
| Serial Processing | Input → Effect 1 → Effect 2 → Output | Lower |
| Parallel Processing | Input → Dry + Processed → Mix | Higher |
This really matters. Serial chains, if you overdo them, can wreck your audio. Parallel setups let you keep the original intact and give you a lot more wiggle room.
Core Benefits Of Parallel Processing In Mixing
The big win with parallel processing is the control. You get to blend in just the right amount of effect, balancing natural dynamics with whatever enhancements you want.
Some of the best perks:
- Punch and power: Parallel compression gives tracks more weight without killing the transients.
- Clarity: Parallel EQ can boost specific frequencies without wrecking the whole tonal balance.
- Depth: Parallel reverb and delay add space, but the dry signal stays clear.
- Texture: Parallel distortion or saturation brings in harmonics and grit, but the original definition is still there.
It’s also a time-saver during the mixing process. Instead of endless edits or new takes, you tweak the wet/dry blend. In computing, you’d call this a speed-up—you get the result faster and with more control.
Common Misconceptions About Parallel Audio Processing
People sometimes think parallel processing makes everything louder. Not true—it’s really about dynamics and tonal balance.
How loud it gets depends on how you blend the signals. Go overboard and you might actually lose clarity.
Another myth: parallel processing is only for drums. Sure, it’s fantastic on drums, but it works for vocals, guitars, synths, the whole mix. Many engineers utilize it across multiple tracks to achieve a more cohesive sound.
Some folks say it’s a pain to set up. But most modern DAWs have wet/dry controls built in, so it’s not as intimidating as it used to be. Aux sends and plugins make routing simple, too.
And finally, there’s this idea that parallel and serial processing are interchangeable. They’re not. Serial chains shape the sound in stages, while parallel paths let you keep the original and add what you need. Knowing the difference helps you use each one the right way.
2. Essential Parallel Processing Techniques For Mixing
Engineers use parallel processing to strike a balance between clarity and impact. By blending a heavily processed signal with the original, they shape tone, dynamics, and space while holding onto the natural feel.
Parallel Compression For Punch And Dynamics
Parallel compression involves taking a super-compressed version of a track and blending it with the dry signal. This way, you get more sustain and density, but the transients stay punchy.
Drums are the obvious winners here. A compressed bus can make kicks and snares sound huge, but the dry track keeps the attack crisp. Vocals can also pop more when parallel compression brings in body without squashing the dynamics flat.
How to do it:
- Send your track to a bus and slam it with compression.
- Bring the compressed version back in at a low level.
- Experiment with ratios and attack to achieve the punch or sustain you want.
This gives you a powerful, controlled sound that doesn’t feel over-processed.

Parallel EQ For Frequency Shaping
With parallel EQ, you copy the signal, EQ the duplicate, then blend it with the dry track. Unlike regular EQ, this leaves the original untouched and lets you boost or cut only what you want.
Say you want more brightness: boost the highs on the parallel chain, but the main track won’t get harsh. Need more low-end? Add it in parallel, and your bass stays tight.
Some uses:
- Give vocals extra air with a high-shelf boost.
- Make snares snap by pushing the mids.
- Add low-end to the bass without making the mix muddy.
This keeps your tonal balance in check and helps avoid over-EQing.
Parallel Saturation And Distortion For Warmth
Parallel saturation involves duplicating a track, applying harmonic distortion, and then blending it back in. You get warmth, harmonics, and a sense of loudness, but the clarity stays put.
Different flavors do different things. Tape saturation adds a bit of compression and heft, while tube or console emulations bring in richer harmonics. By running them in parallel, you keep the original sound safe.
Quick tips:
- Apply saturation on a bus, but avoid going overboard.
- Blend in just enough to taste—too much gets harsh fast.
- EQ the parallel chain if you want to shape the added harmonics.
This trick works on vocals, drums, and even whole mixes.
Parallel Reverb And Delay For Depth And Space
Parallel reverb and delay send your track to an aux bus with time effects, then blend that back with the dry track. It’s a way to add depth and space but keep things clear and upfront.
Short reverbs thicken vocals, long ones create a vibe. Parallel delay can fatten up guitars or add rhythm without making a mess.
How to set it up:
- Send your track to a reverb or delay bus.
- Tweak decay or feedback to fit the groove.
- Blend the return so it sits right—don’t drown the mix.
Parallel routing gives you serious control over spatial effects.

3. Tools And Plugins That Excel At Parallel Processing
Producers and engineers rely on a mix of free plugins, paid tools, built-in DAW features, and sometimes hardware to achieve parallel processing. Each has its perks depending on your budget, workflow, and what kind of sound you’re after.
Best Free Plugins For Parallel Compression And EQ
Free plugins are a great way to get started with parallel processing without spending a dime. TDR Nova gives you dynamic EQ with parallel-like flexibility, so you can tame frequencies and keep things natural.
For compression, MJUC jr. from Klanghelm gives you smooth, musical parallel compression with easy controls. Many people use it to add body to drums or vocals.
Tokyo Dawn Kotelnikov is another solid pick—a mastering-grade compressor that’s clean and works well for transparent parallel compression. You can add punch without weird coloration.
Sure, free plugins might not have all the fancy routing options, but most DAWs let you blend wet/dry easily enough. It’s a no-brainer if you want to experiment before spending money.
Industry-Standard Paid Plugins For Pro Mixes
Paid plugins usually bring more precision and workflow features for pro mixing. Waves SSL G-Master Buss Compressor is a classic—engineers use it in parallel to glue drum buses or whole mixes and keep things dynamic.
FabFilter Pro-C 2 stands out for its flexible compression styles and built-in mix knob, so setting up parallel chains is quick. The visual interface makes it easy to dial in attack and release for any instrument.
For EQ, FabFilter Pro-Q 3 has dynamic EQ and mid/side options, perfect for parallel tonal tweaks. You can target problem spots and blend the fix right back in.
These tools are favorites for their reliability and recall—super important when you need to move fast and keep things consistent in a pro setting.

Using DAW Built-In Tools For Parallel Effects
Most modern DAWs come with built-in options for parallel processing. In Ableton Live, the Audio Effect Rack lets you set up parallel chains and stack devices however you want. You can blend compression, saturation, EQ, and more in layers that feel surprisingly intuitive.
Logic Pro gives you a Compressor plugin with a mix knob, so you don’t have to bother with complicated routing. Just twist the dial and you’re in parallel compression territory—super handy for vocals or drums, and you don’t even need extra plugins.
Pro Tools handles parallel routing with classic aux sends and returns. Engineers often send a drum bus to a slammed aux track, then blend it back with the clean signal for that punchy, modern sound.
Using built-in tools keeps CPU usage down and your sessions portable, so they’re a solid bet whether you’re at home or in a pro studio.
Hardware Gear Options For Analog Parallel Processing
Some engineers still swear by hardware for that analog magic in parallel processing. The Empirical Labs Distressor shows up on tons of drum buses, blended in parallel to add punch and those tasty harmonics you can’t fake.
The API 2500 Stereo Bus Compressor is another favorite. Its flexible controls and unmistakable analog flavor make it a go-to for parallel compression. There’s something about its circuitry—plugins try, but they never quite nail it.
Some hardware even has mix controls built in, which makes parallel processing a breeze. Others need patch bays and a bit of extra wrangling, but that also means more creative routing options if you’re up for it.
Analog gear brings harmonic complexity and saturation that digital tools don’t always capture, so it’s a great choice if you’re working in a hybrid or want that extra mojo in your mixes.


4. Best Practices For Applying Parallel Processing
Parallel processing in audio production takes finesse. You have to keep clarity and punch in mind, so engineers are constantly tweaking for balance, timing, and tonal consistency. The goal? Enhance the mix, not wreck it with weird artifacts.
Setting Proper Levels And Gain Staging
Getting gain staging right is everything with parallel channels. If your parallel signal is too hot, it’ll take over and squash dynamic range. If it’s too low, you could skip it.
Most folks start by matching the processed signal’s level to the dry track. That way, blending feels more controlled and you avoid those annoying volume spikes.
Metering tools help you keep an eye on headroom and clipping. Say you’re running parallel compression—set the bus so peaks stay in check but still add some heft.
Some quick tips:
- Keep peaks at least 3–6 dB below clipping.
- Match RMS levels between dry and wet before final tweaks.
- Use trim or gain plugins for small level changes, so you don’t mess with the dynamics.
Blending Wet And Dry Signals Effectively
The magic of parallel processing really comes down to how you blend wet and dry signals. If you get the balance wrong, things can sound either overcooked or like you didn’t do anything at all.
The dry part keeps the natural feel, while the wet adds weight or color. Many engineers begin with a 70/30 dry-to-wet split, then rely on their ears to tweak it for the song.
Automation is your friend for shifting the blend between different sections. You may want more wet in the chorus for impact, then scale it back in the verses for something more intimate.
Aux sends are usually better than just slapping effects on a track. You can process multiple tracks with the same chain this way, which keeps things consistent and easy to control.
Avoiding Phase Issues And Over-Processing
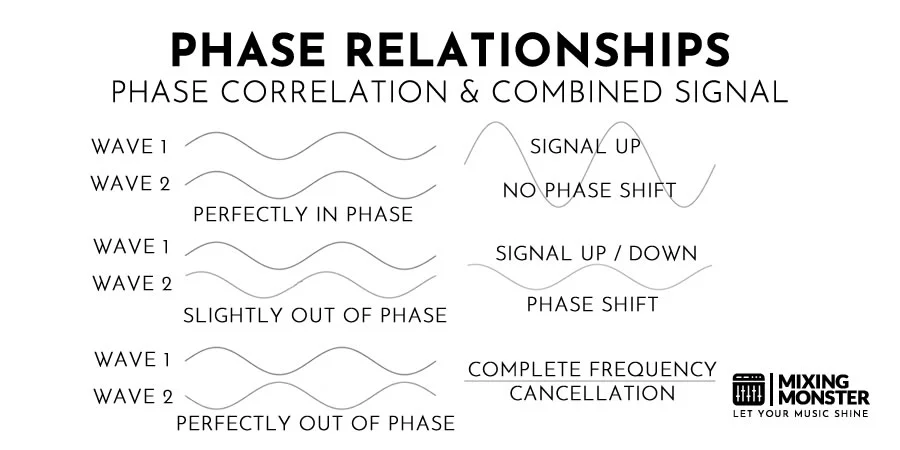
Phase problems are a classic headache with parallel processing. If your signals aren’t lined up, you’ll get weird cancellations, and stuff will sound thin or just off.
Check phase with a correlation meter or flip polarity and listen. Sometimes plugins introduce tiny delays, so you might need to nudge things manually or use a time-align tool.
It’s easy to go overboard. Too much compression, saturation, or EQ in your parallel path can make the mix sound fake. Subtlety usually wins here.
Try muting the parallel bus every so often as you work. It’s a quick way to check if you’re actually improving things or just making a mess.
Creative Uses Of Parallel Chains In Modern Music
Parallel chains aren’t just for fixing stuff—they’re also great for creative sound design. Producers love parallel distortion for adding grit to drums, or blending reverb tails so things feel big but not washed out.
Parallel saturation on vocals can boost presence and warmth, while still preserving the original clarity. The same goes for parallel EQ—emphasize specific frequencies without wrecking the whole track.
In electronic and pop, engineers sometimes stack a couple of parallel chains, like compression plus distortion, to build unique textures. It’s a controlled way to experiment without painting yourself into a corner.

5. Advanced Parallel Audio Processing Techniques
Engineers like to push past basic parallel compression by layering effects and getting into frequency-specific tricks. These advanced moves give you precise control over dynamics, tone, and movement, all while keeping the original vibe intact.
Multi-Band Parallel Compression For Control
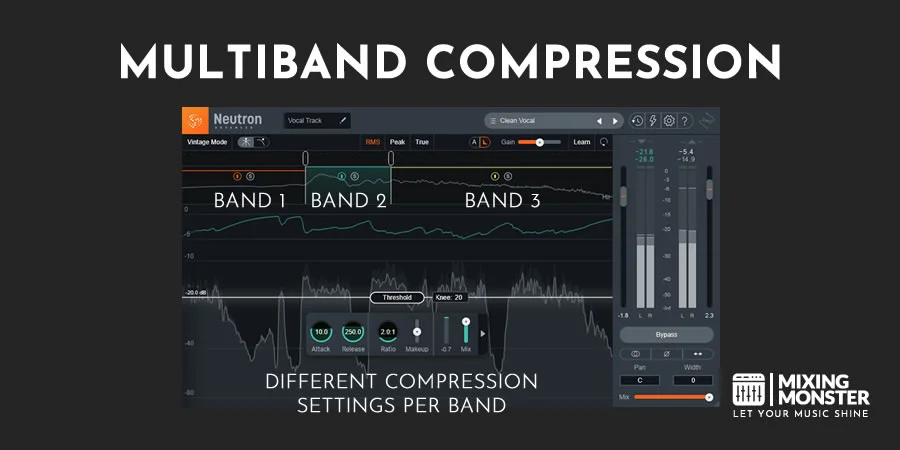
With multi-band parallel compression, you split the signal into different frequency bands, process each one separately, and then put them back together. That way, you can clamp down on low-end transients without killing the airiness of cymbals or vocals.
You hit the sub frequencies hard to steady a kick drum, but go lighter on the mids to save vocal clarity. Parallel routing keeps the unprocessed tone alive underneath it all.
Many DAWs and plugins feature multi-band processors with Dry/Wet controls. It’s a bit like parallel tasks in linear algebra—each band does its thing, then you combine them for the final result.
Choosing crossover points is tricky. Overlapping bands can disrupt phase, and too many splits can quickly complicate things. Most people start with three bands—low, mid, and high—and adjust from there.
Parallel Distortion Layers For Aggressive Mixes
Parallel distortion adds harmonics and attitude without wrecking the original sound. Instead of slapping saturation directly on the track, you copy it or use an aux send, distort that, and then mix it back in.
This works wonders on bass, guitars, and even vocals. Keep a clean low-end for punch, then let the distorted layer bring in grit. Try different flavors—tube emulation for warmth, bit-crushing for something nastier.
It’s kind of like vector processing in computing—multiple things happening at once, but each with its own job. The dry keeps things clear; the distortion adds the color.
But don’t overdo it. Too much distortion buries the details, too little and you won’t notice it. Usually, a light touch is best.
Parallel Sidechain Processing For Groove
Parallel sidechain processing uses compression or gating triggered by another track, but instead of ducking the signal all the way, you blend the effect with the original. This gives you rhythmic movement but keeps the feel natural.
Take a synth pad sidechained to a kick drum. With parallel routing, the pad pulses to the rhythm but doesn’t vanish. You get that groove and still keep the harmonic content.
It’s kind of like pipelining in parallel processing—a steady flow, nothing gets stopped. The dry track holds things together, while the sidechained part adds bounce.
Producers sometimes get creative with the triggers—vocals controlling reverb tails, for example, for some wild textures.

Combining Multiple Parallel Effects For Unique Textures
Sound designers love stacking parallel effects. A vocal might get parallel compression, reverb, and saturation all at once, each effect balanced on its own before blending with the dry track.
This modular approach is a bit like shared memory in parallel processing—the dry track is your anchor, and each effect adds its own twist.
In electronic music and film, producers often combine parallel chains for evolving textures. Maybe a pad gets chorus for width, distortion for grit, and delay for movement—all running side by side.
Stacking layers like this can cause phase or latency headaches, so most engineers rely on DAW delay compensation or do a bit of manual alignment. Soloing each effect first helps keep things from turning into mush.
6. Real-World Examples Of Parallel Processing In Music
Parallel processing pops up everywhere—from punchy drum mixes to glossy pop vocals. Engineers use it to mix power with clarity, so tracks hit hard but stay controlled. Whether it’s compression for punch, saturation for warmth, distortion for grit, or reverb for depth, the technique adapts to whatever the song needs.
Genres That Use Parallel Compression
Parallel compression, or New York compression if you want to sound cool, has been a go-to for decades. It’s how engineers get drums to punch through busy mixes without flattening everything else.
By blending a super-compressed signal with the original, you get punch and sustain but still keep the dynamics. This trick took off in ’80s and ’90s hip-hop and rock—those big, aggressive drum sounds that still had life.
Classic records often sent drum buses to an aux, hit them with fast attack and release, and then tucked the compressed track under the original. That’s how you get fat snares and kicks without losing the snap.
People still use it all the time in both live and studio settings. It works for making drums sound bigger and more energetic, plain and simple.

How EDM Producers Use Parallel Saturation
EDM producers rely on parallel saturation to amplify harmonics and make things sound louder. Instead of frying the whole signal, they process a duplicate with saturation and blend it in until it feels right.
This move fattens up bass lines and synths so they hit hard on big systems. It also helps tracks translate better to headphones, club rigs, or streaming—pretty important these days.
For example, you might run tape-style saturation on a kick drum bus. The extra harmonics help the kick poke through the mids, while the dry track keeps the sub-bass clean and tight.
Many plugins now feature dry/wet knobs, making it quick to dial in parallel saturation. It’s a fast way to add warmth and punch without making the mix muddy, like you’ll see in guides on parallel processing in music production.
Rock And Metal Mixing With Parallel Distortion
In rock and metal, parallel distortion is a secret weapon for aggressive tones that still cut through. Guitars and drums usually benefit the most.
Mixers copy the clean track, apply distortion to the duplicate, and then blend it back in. This gives you grit and sustain, but you don’t lose the original character.
Drums—especially snares and toms—get extra bite this way. Sometimes the whole kit goes through a distortion bus, then gets blended for more energy.
The result? A mix that feels raw and powerful, but you can still hear every detail. It’s beneficial in dense metal mixes where everything’s fighting for space.

Pop Vocals Enhanced With Parallel Reverb
Pop vocals rely on parallel reverb to achieve depth without compromising clarity. Rather than slapping reverb directly onto the vocal, engineers send it off to an aux channel loaded with reverb, then dial in just the right amount.
This approach gives a lot of control. The dry vocal stays right up front, while the reverb sits behind, adding some space and vibe. Most engineers end up EQing and compressing the reverb return to keep things sounding tidy.
They’ll often cut out the lows from the reverb to avoid mud, and a bit of compression keeps it sitting steady. You end up with a vocal that feels wide and lush but still cuts through.
You’ll hear parallel reverb all over modern pop ballads, where vocals need to feel close and personal, yet somehow huge.

7. Key Takeaways For Parallel Audio Processing
Parallel audio processing mixes a processed (wet) signal with the original (dry) track. It lets engineers push effects pretty far while still hanging onto the natural vibe of the source.
You’ll see it used for compression, saturation, EQ, and reverb, each with its own flavor. For instance, parallel compression brings punch and sustain, while parallel saturation adds some sweet harmonics without drowning out the dry track.
Benefits include:
- More control over dynamics and tone
- Room to push effects harder without losing detail
- Flexibility to blend in anything from subtle shimmer to wild textures
Common applications:
| Technique | Purpose | Typical Use Case |
|---|---|---|
| Parallel Compression | Adds punch and density | Drums, vocals, mix bus |
| Parallel Saturation | Enhances warmth and grit | Vocals, bass, synths |
| Parallel EQ | Boosts or cuts without masking | Vocals, kick, guitars |
| Parallel Reverb/FX | Creates depth and space | Vocals, snare, ambience |
Getting the gain staging and levels right is crucial here. If you don’t, you might run into phase issues or weird jumps in volume.
Happy parallel processing!

FAQ
1) What is parallel processing in audio mixing?
Parallel processing in audio mixing involves sending a copy of your original track through some effects while keeping the dry signal untouched. Afterward, you blend the two to taste. It’s a great way to shape your sound without locking yourself into just one processed version.
2) What's the difference between serial and parallel processing in audio?
Serial processing runs effects one after the other—each plugin or effect changes the sound before it moves on. With parallel processing, you split the signal into separate lanes, process each one differently, then bring them back together. It’s similar to how parallel processing in computer systems allows multiple cores to handle different tasks simultaneously.
3) How does parallel compression improve mix quality?
Parallel compression mixes a seriously squashed signal with the original. You keep the natural dynamics but add punch and glue from the compressed side. Drums, vocals, even complete mixes—this trick helps everything feel more present without losing life.
4) What are the best plugins for parallel audio processing?
Most DAWs and third-party plugins these days make parallel routing pretty straightforward. Compressors, saturators, reverbs—they all get used in parallel chains. A lot of modern plugins even have built-in mix controls, so you don’t have to fuss with extra routing.
5) How do I avoid phase issues when using parallel effects?
Phase issues occur when your processed and unprocessed tracks don’t align in time. Using plugins with built-in delay compensation—or just lining things up by hand—usually sorts it out. Many engineers also check their mix in mono to make sure the blend holds up.
6) Can parallel processing be used on vocals and drums?
Absolutely—engineers love using parallel compression and effects on vocals to boost presence, and on drums for extra punch. You’ll often find vocals running through reverb or a touch of saturation in parallel, while drums just come alive with some parallel compression to bring out those transients. It’s a flexible way to enhance the mix without messing with the original vibe.

