Home > Blog > Mixing > Mixing Techniques
In music production, understanding how to compress audio in mixing is not just beneficial; it’s essential. Our guide on compressing audio will illuminate the path to crystal-clear soundscapes and impeccable production quality while mixing audio. Buckle up and prepare to dive into the deep sea of audio compression – a skill necessary for achieving perfect, dynamic mixes!
Audio compression involves reducing the dynamic range of an audio signal, thus balancing loud and soft sounds. Compression can enhance audio dynamics and clarity by setting parameters like threshold, ratio, attack, and release times, making it suitable for release and distribution.
Are you ready to unravel the intricacies of audio compression and take your soundscapes to the next level? Venture into compression as we unveil techniques that could dramatically enhance your audio mixing skills.
Table Of Contents
1. Understanding The Basics Of Audio Compression In Audio Mixing
2. Different Types Of Audio Compressors
3. How To Use Audio Compression In Mixing
4. Best Practices In Audio Compression
5. Advanced Audio Compression Techniques In Mixing
6. Common Audio Compression Pitfalls And How To Avoid Them
7. Audio Compression Software And Hardware
8. Get Perfect Dynamics With Audio Compression
9. FAQ

1. Understanding The Basics Of Audio Compression In Audio Mixing
What Is A Compressor In Audio Processing?
An audio compressor is a powerful sound engineering and music production tool. But what exactly is it?
An audio compressor is a device that helps control the dynamics of an audio signal.
This means it can make quiet sounds louder and loud sounds quieter. Think of it as an automated volume fader, that is adjusting the level of an audio signal in real-time.
Have you ever wondered how to process audio for an evenly balanced, professional sound mix? That’s where a compressor comes in. It’s all about achieving the perfect balance and keeping your tracks dynamic at the same time.
Definition And Importance Of Audio Compression In Mixing
Audio compression in mixing is the process of reducing the dynamic range of an audio signal. The dynamic range refers to the difference between an audio track’s loudest and quietest parts.
When we compress audio, we reduce this range, making the softer parts of a track more audible and preventing the louder parts from distorting. The result? A more balanced, polished, and professional-sounding mix.
So why is it important? Well, without compression, your tracks may sound unbalanced and amateurish. The quiet parts might be too quiet, and the loud parts might be too loud.
By compressing your audio, you ensure a consistent and pleasing listening experience.
Key Terminology To Understand In Audio Compression
When learning how to compress audio, it’s essential to familiarize yourself with some key terminology:
- Threshold:
The threshold is the decibel level at which the compressor starts to work. If the audio signal volume exceeds the threshold, the compressor activates. For example, if the threshold is set at -10 dB, any part of the audio that exceeds -10 dB will be compressed. This means you can use the threshold to control which parts of your audio signal get compressed precisely. - Ratio:
The ratio determines the amount of gain reduction applied to the signal that exceeds the threshold. For instance, if you set a compression ratio of 4:1, for every 4 dB that the input level exceeds the threshold, the output level will only increase by 1 dB. So, if your input were 8 dB over the threshold, a 4:1 compression ratio would result in an output of only 2 dB. A higher ratio results in more severe compression. - Attack:
The attack time determines how quickly the compressor starts to work after the signal has exceeded the threshold. For example, an attack time of 5 milliseconds means that it takes 5 milliseconds for the compressor to reach its full compression amount once the signal surpasses the threshold. A faster attack time can make the sound tighter, while a slower attack allows more initial transient through, preserving a more natural feel. - Release:
The release time is the compressor’s duration to stop compressing after the signal has fallen below the threshold. For instance, if you set the release time to 100 milliseconds, the compressor will take 100 milliseconds to stop compressing after the signal level drops below the threshold. Shorter release times can make the compressor react more quickly to changes in the input level, while longer release times can result in smoother compression.
When adjusted correctly, these four parameters can help you shape the dynamics of your audio signal effectively. The key is understanding what each parameter does and then experimenting with different settings until you achieve the desired sound.
2. Different Types Of Audio Compressors
Types Of Audio Compressors Explained
One thing becomes apparent quickly when diving into how to compress audio: not all compressors are created equal.
Different audio compressors can be used for various purposes in the mixing process. Let’s take a brief look at some of the most common types:
- VCA (Voltage Controlled Amplifier):
These versatile compressors can provide a wide range of compression effects, from subtle smoothing to aggressive punch. - FET (Field-Effect Transistor):
Known for their fast attack times, FET compressors add warmth and character to your mix. - Optical Compressors:
These rely on a light source and photosensitive cell to control the compression level, creating smooth and musical compression perfect for vocals and bass. - Tube Compressors:
Tube compressors use vacuum tubes in their signal path, providing a rich and warm compression effect that can sweeten a mix.
Understanding the nuances of these compressors can help you make informed decisions about how to compress audio for your specific project.
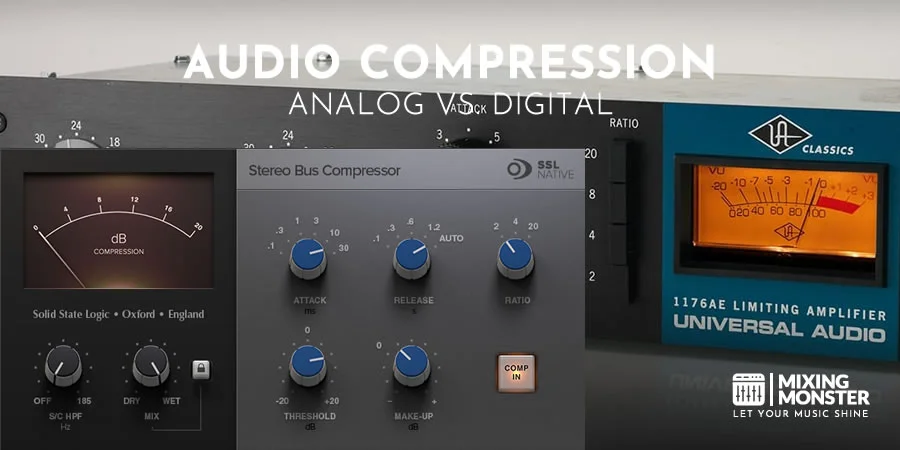
Digital Vs. Analog Audio Compressors
So, what’s the difference between digital and analog audio compressors? Well, the core functionality remains the same; they both reduce the dynamic range of an audio signal.
However, the difference lies in how they process the audio signal.
- Digital Compressors:
These are software-based and provide precise control over the compression parameters. They’re versatile, convenient, and perfect for home studios or mobile setups. - Analog Compressors:
These hardware units use physical circuitry to compress the audio. They’re known for adding a distinct warmth and character to the sound.
How To Choose The Right Audio Compressor
Choosing a suitable compressor can feel daunting, but it doesn’t have to be. Here are a few pointers:
- Consider Your Needs:
Different compressors are better suited for different tasks. Are you compressing a vocal track or a drum kit? Consider what you’re compressing before choosing your compressor. - Budget:
Hardware compressors can get pricey, but plenty of affordable digital options exist. Balance your needs with your budget. - Try Before You Buy:
Many digital compressors offer free trials. Take advantage of this to find one that suits your style and workflow.
By understanding these concepts, you’ll be better equipped to navigate audio compression. Let’s explore further how to compress audio in your mixing process.
3. How To Use Audio Compression In Mixing
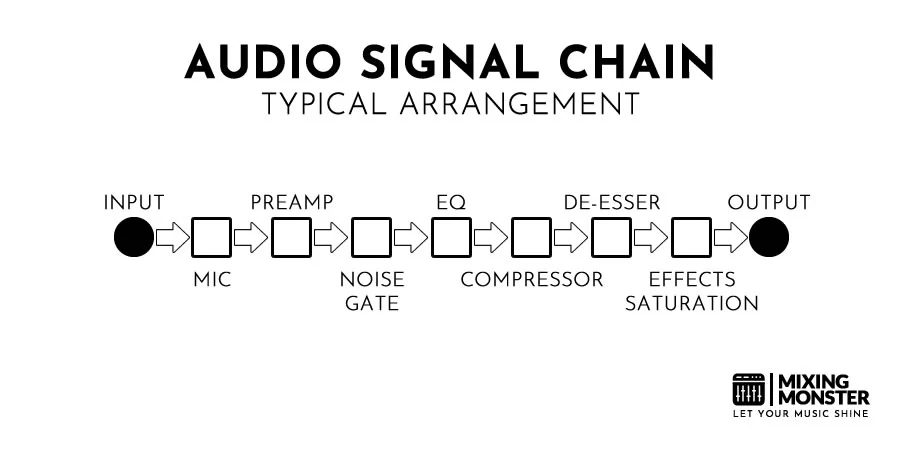
Where To Place A Compressor In The Signal Chain?
The signal chain refers to how your audio processing tools are lined up. So, where should a compressor sit? While there’s no one-size-fits-all answer, a general rule of thumb is to place the compressor after any gain-staging or EQ adjustments.
This way, you’ll be compressing a clean, balanced signal. However, experimenting with different placements could also lead to some impressive results. Remember that rules can often be broken in favor of creativity when learning how to compress audio.
How To Use An Audio Compressor
Here’s a simple step-by-step guide to using an audio compressor:
- Set The Threshold:
Determine the level at which the compressor will start to work. Make sure to compress only the desired parts of the audio transients. - Choose The Ratio:
Decide how much compression will be applied once the threshold is reached. Be aware of over-compression and try to find a balanced ratio value. - Adjust The Attack And Release:
Determine how fast the compressor responds after the signal exceeds the threshold and how long it compresses after the signal drops. - Check The Gain Reduction Meter:
This helps monitor how much the audio signal is reduced. - Apply Makeup Gain:
After compression, you may need to boost the signal to keep it at a desirable level.
Remember, these steps are just a starting point. Each mix is unique, and using your ears to achieve the best results is essential.
How To Compress Audio Tracks
To effectively compress audio tracks, keep these tips in mind:
- Avoid Over-Compression:
Too much compression can make your mix sound lifeless and dull. - Use compression Sparingly:
It’s often better to apply a small amount of compression multiple times rather than a large amount simultaneously. - Consider Stacking Multiple Compressors:
Experiment using multiple compressors on an audio signal instead of only one. - Beware of Pumping:
If you hear a ‘pumping’ effect, it’s probably because your release time is too short.
Audio Compression And Dynamic Range
One of the primary purposes of audio compression is to control dynamic range. The dynamic range is the difference between your audio’s loudest and softest parts.
Using a compressor can reduce this range and ensure a more balanced and controlled sound. This is especially important in modern music production, where the goal is often to achieve a loud, impactful mix without distorting or damaging the audio.
Remember, while mastering how to compress audio, aim to strike a balance between taming dynamics and preserving the natural expressiveness of the music.
Want to learn more about dynamic range? Here’s an article for you:
4. Best Practices In Audio Compression
Practical Guidelines For Using Audio Compression
When understanding how to compress audio, some practical guidelines can be crucial. Always start with a low ratio and increase it gradually.
If your aim is transparency, try to achieve subtle, natural-sounding compression instead of drastic, noticeable compression. However, if you’re after an effect, feel free to push the compressor to its limits.
Recommendations For Compressing Different Instruments
Different instruments and vocals in a mix have unique dynamic characteristics that require individual compression settings.
Here’s a table that offers a starting point for compressing some common instruments and vocals:
| Audio | Attack | Release | Ratio |
| Vocals | Fast (1-5 ms) | Medium (50-100 ms) | 2:1 – 4:1 |
| Drums | Fast (0.1-1 ms) | Fast (5-50 ms) | 4:1 – 6:1 |
| Bass | Medium (10-30 ms) | Medium (100-300 ms) | 4:1 – 6:1 |
| Acoustic Guitar | Medium (10-30 ms) | Medium (50-100 ms) | 3:1 – 5:1 |
| Electric Guitar | Fast (1-5 ms) | Fast (50-100 ms) | 3:1 – 5:1 |
| Synthesizers | Medium (5-20 ms) | Medium (50-200 ms) | 3:1 – 5:1 |
| Piano | Medium (2-10 ms) | Medium (50-100 ms) | 2:1 – 4:1 |
Please note that these are just starting points and may require fine-tuning based on the specifics of your mix. The threshold values always depend on the levels and transients of the audio source and need to be adjusted to taste.
Compression Techniques For Bus Mixing
Bus mixing involves routing multiple tracks to a single bus, allowing you to apply effects like compression to several tracks simultaneously. There’s a distinct difference between mix bus compression and group bus compression.
- Group Bus Compression:
Here, compression is applied to a specific group of instruments (like all drums or all backing vocals), helping to unify them and create a more polished, consistent sound within that group. - Mix Bus Compression:
This technique applies compression to the entire mix, helping glue all elements together and achieving a balanced and cohesive sound.
Mastering mix bus compression is a crucial task in any audio mixing project. Feel free to learn more about it here:
Best Settings For Audio Compression In Various Genres
The optimal compression settings can differ significantly depending on the genre:
- Rock/Pop:
These genres use heavier compression to achieve a punchy, upfront sound. - Jazz/Classical:
Lighter compression is usually employed here to preserve the performances’ dynamic range and natural feel. - EDM/Hip-Hop:
These genres often use a mix of heavy compression (for a punchy, tight sound) and lighter compression (for a dynamic, spacious sound). - Country:
Typically uses moderate compression to retain the dynamics while keeping a polished sound. - Reggae/Dub:
These genres often use heavy compression to create rhythmic, pulsing effects.
Benefits Of Using Compression In Mono Vs. Stereo
In audio mixing, both mono and stereo compression have their benefits. Mono compression allows for precise control over individual tracks, making it ideal for shaping the tonal quality of specific instruments or vocals.
It will enable you to focus on each element in isolation, enhancing its best qualities without affecting the rest of the mix.
On the other hand, stereo compression is applied to the mix as a whole, helping to glue the mix together and maintain a balanced stereo image. Compressing both the left and right channels together ensures a consistent dynamic range across the entire stereo field.
It’s crucial to mention that using both in conjunction often yields the best results. By applying mono compression to individual tracks and stereo compression on the master bus, you can effectively control the dynamics of your mix at both the micro and macro levels.
Finally, let’s remember one thing: these are all tools at your disposal, and there are no fixed rules.
Every mix is unique, so always trust your ears! By testing, tweaking, and experimenting with these guidelines, you’ll be able to find the sweet spot for your tracks and craft a mix that not only sounds good but feels good too.
This is the real essence of learning how to compress audio.

5. Advanced Audio Compression Techniques In Mixing
Using Multiband-Compression In Audio Mixing
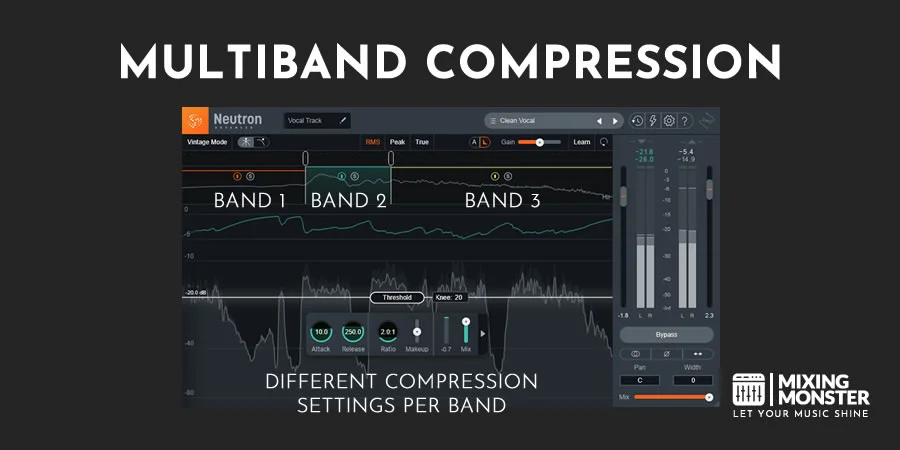
Multiband compression is an advanced technique that allows you to independently compress different frequency ranges of an audio signal. This can be particularly useful when you want to control the dynamics of a specific frequency range without affecting the rest of the signal.
For example, if the bass frequencies of a vocal track are too dynamic, you can compress just that range without affecting the mid and high frequencies. This allows you to retain the natural dynamics of the vocal performance while ensuring the bass frequencies do not overpower the mix.
Below you see an example of a multiband-compressor processing a vocal track:
Using Audio Compression And Side-Chaining In Mixing
Side-chain compression is another advanced technique often used in music production. It involves using the audio signal from one track to trigger the compressor on another. This can help create space for prominent elements such as the kick drum or vocals.
For instance, the bass line is side-chained to the kick drum in many electronic and pop music productions. This means every time the kick drum hits, the compressor reduces the level of the bass line, allowing the kick to cut through the mix more clearly.
Learning how to compress audio using side-chain compression can create a more balanced and professional-sounding mix. But remember, subtlety is essential when using these advanced techniques. It’s often more practical to apply a small amount of compression multiple times than a large amount simultaneously.
These advanced audio compression techniques are a step towards making your mixes sound professional and engaging. Understanding these techniques and when to apply them can be the difference between a good mix and a great one.
6. Common Audio Compression Pitfalls And How To Avoid Them
Over-Compressing: Causes And Solutions
A common pitfall when learning how to compress audio is over-compression.
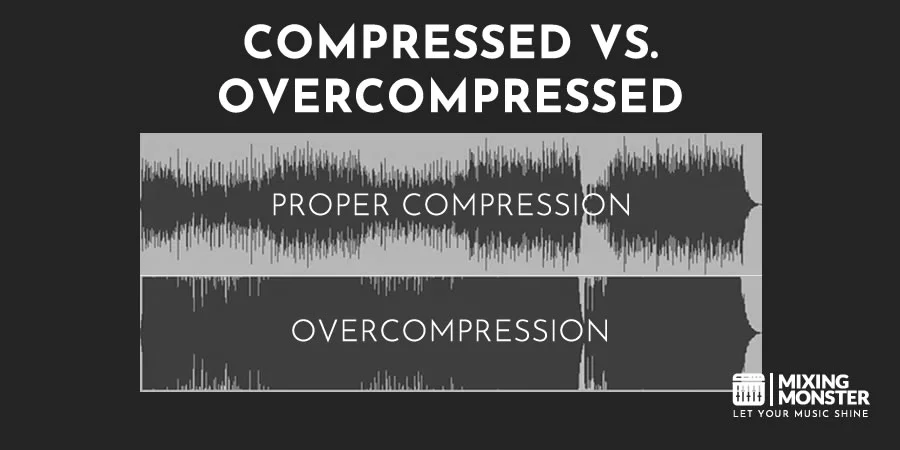
Over-compression occurs when too much compression is applied, leading to a loss of dynamic range and a dull, lifeless sound. It can also cause “pumping” and “breathing” artifacts where the volume level unnaturally fluctuates.
Here are a few tips to avoid over-compression:
- Listen Carefully:
Use your ears as your primary guide. You might be over-compressing if the audio sounds squashed or lack dynamic contrast. - Start Low And Slow:
Start with a low compression ratio and slow attack and release times. Gradually adjust these settings while carefully listening to the impact on your audio. - Bypass Frequently:
Regularly bypass your compressor to compare the processed and unprocessed signals. This can help you gauge whether the compression enhances or detracts from the audio.
Not Using Compression In Highly Dynamic Audio Tracks
Another common pitfall is not using compression when it’s needed. If a track in your mix has a wide dynamic range with loud and tranquil parts, finding a consistent volume level that works for the entire mix cannot be easy.
Here are some tips to address this issue:
- Identify Highly Dynamic Tracks:
Listen out for tracks with inconsistent volume levels. - Apply Compression Gradually:
Use a compressor to reduce the dynamic range slowly. Start with a low ratio and adjust the threshold until you achieve a more consistent volume level. - Use Makeup Gain:
If the track is too quiet after compression, use the makeup gain to back up the level.
Remember, the key to successful compression lies in the balance. It’s all about preserving the natural dynamics and transients of performance while ensuring that nothing is too loud or quiet in the mix’s context.
Understanding audio transients when compressing audio is vital:
7. Audio Compression Software And Hardware
Audio Compression Software
In today’s digital age, learning how to compress audio effectively is easier than ever, thanks to many high-quality software compressors available. These tools offer a range of compression styles, from vintage and warm to modern and transparent.
Below is a list of some popular audio compression software:
- FabFilter Pro-C2:
Known for its clean and transparent sound, the FabFilter Pro-C2 is a versatile compressor with eight different compression styles. - Waves CLA-2A:
Modeled after the legendary LA-2A compressor, the CLA-2A by Waves adds warmth and richness to your audio. - Cytomic The Glue:
Inspired by the classic SSL Bus Compressor, The Glue is perfect for adding cohesion and clarity to your mix. - Klanghelm MJUC:
This software is a variable-tube compressor offering three distinct compression models for various sounds. - Native Instruments Supercharger GT:
Combining the warmth of analog compression with the flexibility of digital, Supercharger GT adds a unique, tube-like character to your mixes.
Audio Compression Hardware
Hardware compressors offer a physical interface and often a unique analog sound for those who prefer a more hands-on approach.
Here is some renowned audio compression hardware:
- Universal Audio 1176LN:
A classic in any recording studio, the 1176LN offers ultra-fast attack times and adds a desirable character to the audio. - API 2500:
Great for individual tracks and the mix bus, the API 2500 is known for its versatility and warm, punchy sound. - Empirical Labs Distressor:
Known as a “Swiss army knife” of compressors, the Distressor can mimic the characteristics of various classic compressors and is valued for its flexibility. - Manley Variable Mu:
This legendary piece of gear is renowned for its smooth, natural compression that enhances the audio without coloring it. - Tube-Tech CL 1B:
Famed for its warm sound and simple controls, the Tube-Tech CL 1B is a favorite among professional mixers and mastering engineers.
Whether you choose software or hardware depends on your preferences, budget, and specific needs. Both types can be powerful tools when learning to compress audio and can help you achieve professional-sounding mixes.
8. Get Perfect Dynamics With Audio Compression
Learning how to compress audio can seem daunting, but careful listening and the right approach can be the key to achieving perfect dynamics in your mixes. Here are a few final tips to consider:
- Understand Your Goals:
Before applying compression, clearly understand what you’re trying to achieve. Are you trying to control the dynamic range, add sustain to a note, or add punch to a drum track? Having a clear goal will guide your decisions. - Listen And Adjust:
Always listen carefully while adjusting the compressor settings. Use the compressor’s bypass feature to compare the compressed and uncompressed audio constantly. - Avoid Over-Compression:
Be careful not to over-compress. While compression can be a powerful tool, too much can make the mix sound lifeless and introduce unwanted noise and distortion. - Trust Your Ears:
Trust your ears. While understanding the technical aspects of compression is essential, the ultimate judge of a good mix is how it sounds. - Keep The Concept Of Audio Headroom In Mind:
When talking about audio compression, you must understand the concept of audio headroom:
- Consider Target LUFS:
Ultimately, you want your mix to get to a certain loudness standard, often measured in LUFS. Proper compression plays a huge role in achieving that goal.
Mastering the art of compression can take time, but with practice, it’s an attainable skill for anyone dedicated to creating great audio mixes.
Remember that each track is unique, and there’s no one-size-fits-all approach.
So, keep experimenting, learning, and, most importantly, having fun with the process. That’s the beauty of audio mixing and compression!
Happy compressing!
9. FAQ
- How Much Should I Compress My Audio?
The amount of compression needed depends on the source material, the genre, and the desired sound. Generally, it’s best to use enough compression to achieve your goals without negatively affecting the audio. Remember, adding more compression later than removing over-compression is easier. - What Are The Risks Of Over-Compression?
Over-compression can reduce the dynamic range, making the music flat and lifeless. It can also introduce distortion, produce a pumping effect, or bring up unwanted noise from the background. - Is There A Best Compression Ratio For Audio Mixing?
There isn’t a “best” compression ratio that fits all scenarios. The optimal ratio depends on the dynamic range of the source material and the desired result. A lower ratio (e.g., 2:1) is often used for gentle leveling, while a higher ratio (e.g., 8:1) may be used for more aggressive control of dynamics. - How Do I Know If I Have Compressed My Audio Correctly?
A well-compressed audio should still sound dynamic and alive but with controlled peaks. It shouldn’t cause distortion or unwanted noise. The actual test is how it sounds to your ears – if it sounds good, it probably is good! - What’s The Difference Between Limiting And Compression?
While limiting and compression control dynamics, a limiter is essentially a compressor with a high ratio (often 10:1 or higher). Limiters are typically used to prevent peaks from exceeding a certain level, while compressors are used to shape the dynamics of an audio signal subtly.

