Affiliate Disclaimer: We may earn a commission if you purchase through our links
Limiting in mastering is a critical step in the final audio production process, where the ultimate goal is to achieve an industry-standard, balanced loudness without compromising the dynamic range. This guide dives deep into the art of audio limiting, exploring its necessity, impact, and finesse required to master audio tracks with precision and creativity.
Limiting in mastering, a process in audio engineering, ensures the consistency and industry-standard loudness of sound by controlling the maximum level of an audio track. Essential in the final stage of mastering, it balances loudness and dynamic range, preparing tracks for various playback environments. This technique preserves audio quality while achieving desired loudness levels.
Exploring the nuances of limiting in mastering is crucial for any audio engineer looking to produce top-quality sound. This comprehensive guide will take you through the steps of effectively applying limiting to your audio tracks. Whether you’re a beginner or an experienced professional, you’ll find valuable insights into achieving perfect, dynamic results, understanding the role of LUFS values, and adapting techniques to different audio genres.
Table Of Contents
1. What Is Limiting In Mastering?
2. How Audio Limiting Works
3. Types Of Audio Limiters: Analog Vs. Digital
4. Preparing Your Track: Steps Before Audio Limiting
5. Step-By-Step Guide To Limiting In Mastering
6. Audio Limiting Techniques And Best Practices
7. Genre-Specific Audio Limiting Approaches
8. The Relationship Between LUFS And Limiting
9. Mastering The Art Of Limiting
10. FAQ

1. What Is Limiting In Mastering?
What Is Limiting And What Are Limiters In Mastering?
Limiting in mastering is a critical audio processing technique to control the loudest parts of an audio track. It involves using a limiter, a specialized type of compressor, to prevent the audio signal from exceeding a certain threshold.
This ensures the track doesn’t peak too high and cause distortion, especially when played on different audio systems. Limiters are essential for mastering, offering the last defense against unwanted audio clipping and ensuring a clean, polished final product.
Understanding The Basics Of Limiting In Mastering
At its core, limiting is about managing dynamics. It’s a delicate balance between maintaining a track’s natural ebb and flow while ensuring it meets the loudness standards of today’s music industry.
Understanding how to use limiters effectively is fundamental for mastering engineers, as it prevents distortion and contributes to the track’s overall tonal and dynamic balance.
Mastering with limiters requires a keen ear and a deep understanding of how different settings affect the sound.
The Importance Of Limiting In Modern Audio Mastering
In modern audio mastering, limiting is more crucial than ever. With the loudness war still prevalent, achieving a competitive loudness level without sacrificing dynamic range is challenging.
Limiters play a vital role in achieving this balance. They help ensure that a track sounds consistent and powerful across all playback systems, from high-end audio equipment to streaming services.
A well-limited track stands out in clarity, volume, and impact, making limiting an indispensable part of mastering.
2. How Audio Limiting Works
How Does Audio Limiting Work?
Audio limiting works by applying a ceiling to the audio signal level, ensuring it does not surpass a predetermined threshold. When the signal approaches this threshold, the limiter reduces its gain to prevent it from going any higher.
Depending on the settings, this process is instantaneous and can be aggressive. The key to effective limiting is setting the threshold and release times in a way that controls the peaks while preserving the natural character of the music.
Technical Aspects Of Audio Limiting
The technical aspects of audio limiting are crucial for mastering engineers to understand. It involves parameters like threshold, attack, release, and output level.
The threshold determines the level at which limiting starts, the attack controls how quickly the limiter responds to peaks, and the release sets how fast the limiter stops reducing the gain after the peak has passed.
These parameters must be finely tuned to ensure the limiter acts effectively without causing undesirable artifacts like pumping or distortion.
Dynamic Range Control Through Audio Limiting
One of the primary purposes of audio limiting is dynamic range control. It’s about balancing the loudest and quietest parts of a track. By limiting the peaks, engineers can increase the track’s overall loudness without affecting the quieter parts too much.
This results in a track that meets the loudness standards and retains its dynamic expression. Effective dynamic range control is essential for music to sound lively and engaging, especially in today’s competitive music industry.
Learn more about dynamic range in this article:
3. Types Of Audio Limiters: Analog Vs. Digital
Characteristics Of Analog Limiters
Analog limiters, the traditional limiters, are known for their warmth and character. They operate using physical components like vacuum tubes or transistors, which impart a distinct sonic quality to the audio.
Analog limiters often introduce a subtle form of harmonic distortion that can enhance the musicality of a track. Their response to audio signals tends to be smoother and more musical, so they are still favored in many professional mastering studios.
Advantages Of Digital Limiters
Digital limiters, on the other hand, offer precision and versatility. They are software-based, allowing for more detailed control over the limiting parameters. Digital limiters can handle fast transients more effectively and provide a cleaner, more transparent limiting form.
They also adapt to various mastering needs, from subtle peak reduction to aggressive loudness maximization. With advancements in digital audio technology, digital limiters have become increasingly sophisticated, capable of achieving results once only possible with analog equipment.
Choosing The Right Audio Limiter For Your Needs
The choice between analog and digital limiters depends on the specific needs of the project and the desired sonic characteristics.
Analog limiters are ideal for projects requiring warmth and character, often sought in rock, jazz, or classical genres.
Digital limiters are more suited for contemporary genres like hip-hop, where clarity and loudness are paramount.
Mastering engineers often combine both to achieve the best of both worlds, blending the musicality of analog with the precision of digital.
4. Preparing Your Track: Steps Before Audio Limiting
Understanding The Audio Source Material
Before applying any limiting, it’s essential to understand the audio source material thoroughly. This involves listening to the track critically to identify its dynamic range, frequency balance, and any potential issues like clipping or excessive sibilance.
A good mastering engineer will evaluate the track in the context of its genre, intended audience, and playback platforms. This initial assessment guides the subsequent steps and helps make informed decisions during the limiting process.
Analyzing The Audio Material Before Limiting
Analyzing the audio material involves more than just a critical listening session. It often includes using visual tools like waveform analyzers and spectral displays.
These tools help identify specific parts of the track that might need attention before limiting. For instance, an overly prominent bass or a sharp high-end can be addressed through equalization to ensure a balanced response when the limiter is applied.
This analysis is crucial for achieving a cohesive and polished final master.
Compression And EQ Before Limiting
Applying compression and equalization (EQ) before limiting is a standard practice in mastering.
Compression controls the dynamic range, gently reducing the difference between the loudest and quietest parts of the track. This makes the audio more consistent in volume, which is essential for effective limiting.
On the other hand, EQ is used to balance the frequency spectrum, ensuring that no part of the audio is overly dominant. Removing resonant peaks and overbearing frequencies is crucial to achieving professional limiting results.
Proper compression and EQ ensure the limiter can work more effectively, resulting in a more natural and transparent sound.
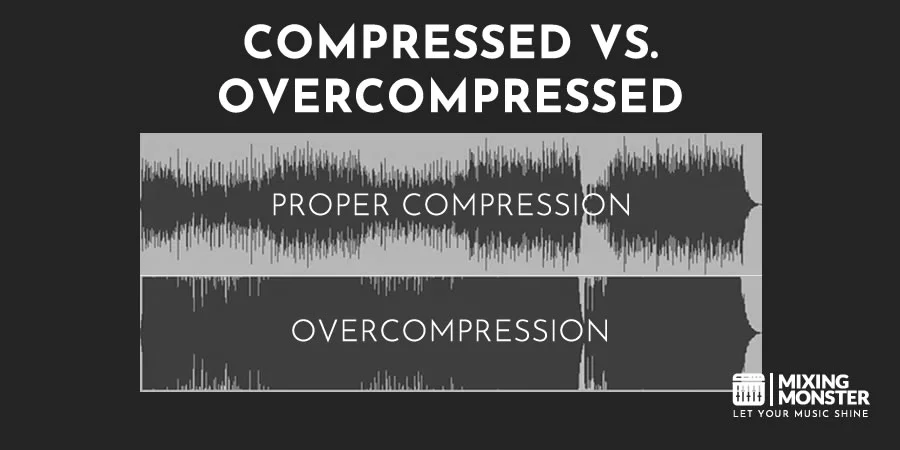
You need to be familiar with audio compression in order to fully understand limiting. In essence, a limiter is a compressor with a very high ratio. Feel free to learn more about audio compression here:

5. Step-By-Step Guide To Limiting In Mastering
Setting Up A Limiter: The Basics
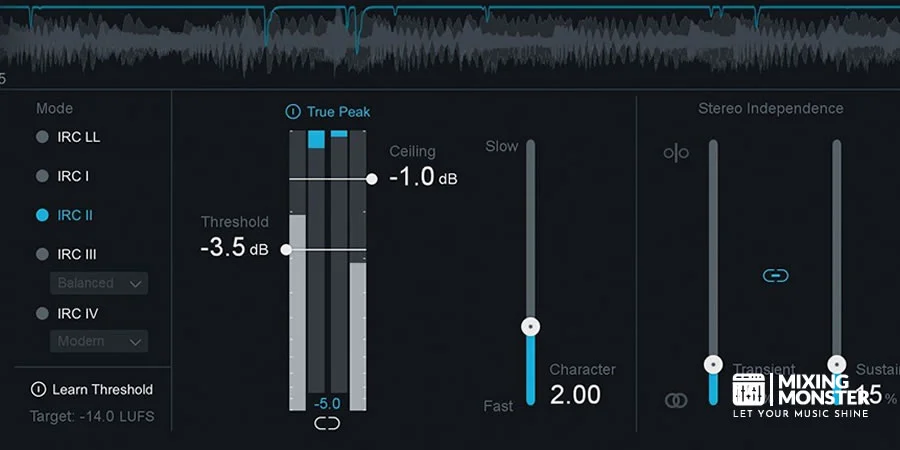
Setting up a limiter effectively is a fundamental skill to master. Start by inserting the limiter at the end of your signal chain. The first parameter to adjust is the threshold; this determines the level at which the limiter starts to engage.
Set it just below the peaks of your track to prevent clipping. Next, adjust the output or ceiling level to control the maximum output of your track, typically a bit below 0 dB, to ensure no clipping occurs on different playback systems.
Dialing In Specific Values In Audio Limiting
After setting the basic parameters, it’s time to fine-tune your limiter settings. Pay attention to the attack and release times. A faster attack time will control transients more aggressively, while a slower attack allows more of the track’s dynamics to pass through.
The release time controls how quickly the limiter disengages after reducing the gain. A shorter release time can make the limiting less noticeable, but too fast can cause distortion.
Dial these values while listening critically to achieve the desired balance between loudness and dynamics.
Referencing And Metering Audio Loudness
Referencing other tracks in your genre can provide valuable insights into appropriate loudness levels. Use loudness meters to gauge your track’s overall level, typically measured in LUFS (Loudness Units relative to Full Scale).
Aim for a competitive loudness level, but not at the expense of your track’s dynamic range.
You do not want to “crush” your track’s tasteful dynamics and transients to make it as loud as possible!
Be mindful of the standards set by streaming platforms, as they often normalize tracks to specific loudness levels.
How To Apply Limiting In Mastering
- Setting Up Your Limiter
- Insert the limiter at the end of the signal chain.
- Adjust the threshold level to just below the peaks.
- Set the output level a bit below 0 dB.
- Fine-Tuning Limiter Settings
- Determine the ideal attack and release times.
- Monitor the gain reduction to avoid over-compression.
- Regularly bypass the limiter for A/B comparisons.
- Referencing And Metering
- Compare your track with similar genre tracks for loudness levels.
- Use LUFS meters to gauge overall loudness.
- Aim for a balanced loudness without losing dynamic expression.
- Exploring Special Functions
- Experiment with lookahead and stereo-linking features.
- Try out different limiter algorithms for varied sonic characteristics.
- Make adjustments while continuously monitoring the audio.
6. Audio Limiting Techniques And Best Practices
Best Practices In Audio Limiting
When it comes to audio limiting, there are several best practices that mastering engineers should follow. First, always listen to the track in its entirety before applying limiting to understand its dynamic range and identify any potential issues.
Use limiting sparingly; over-limiting can squash the dynamics and make the track sound lifeless. Ensure the limiter’s settings are tailored to the track’s needs, considering the genre, intended audience, and final playback platforms.
Advanced Audio Limiting Strategies
Advanced audio limiting involves more than just setting threshold and output levels. Consider using multiple stages of limiting, with each step doing a small amount of gain reduction. This can result in a more natural and less processed sound.
Explore using different types of limiters in series or parallel to achieve different textures. Pay attention to how the limiter interacts with other processing elements in your chain, like EQ and compression, to ensure a cohesive sound.
Common Audio Limiting Mistakes To Avoid
A few common mistakes can hinder the effectiveness of audio limiting. Avoid setting the limiter threshold too low, as it can lead to over-compression and loss of dynamic range.
Be cautious of relying solely on visual meters; use your ears to judge the impact of limiting the audio. Also, beware of the loudness war trap; louder isn’t always better, especially if it compromises the track’s dynamics and overall sound quality.
7. Genre-Specific Audio Limiting Approaches
The Impact Of Genre On Audio Limiting Decisions
Different music genres often require distinct approaches to limiting due to their unique sonic characteristics.
For example, a dense, heavily layered electronic dance music track might require more aggressive limiting than a dynamic acoustic jazz recording. These genres are perfect examples of different audio-limiting approaches.
Understanding the genre’s standard sound and audience expectations is crucial in making informed limiting decisions that enhance the track’s overall appeal.
Tailoring Audio Limiting Techniques To Different Genres
Tailoring your limiting approach to a specific genre involves several considerations.
In rock or metal, you might aim for a punchier sound with tighter limiting on the transients. In contrast, classical or jazz recordings often benefit from a more transparent limiting approach to preserve their dynamic range and natural expression.
It’s essential to strike the right balance between loudness and dynamics, keeping the genre’s characteristics in mind.
Audio Limiting In Various Music Styles
Exploring limiting techniques across different music styles can provide valuable insights.
For instance, in pop music, where vocal clarity and consistency are critical, limiting can help maintain a steady vocal level throughout the track. In hip-hop and electronic music, where beat and bass are prominent, limiting can ensure these elements stand out without overpowering the mix.
Each style offers unique challenges and opportunities for creative limiting applications. To give you an idea about how to apply audio limiting to specific music genres, here’s a quick table for you:
| Genre | Limiting Approach | Key Considerations |
| Rock/Metal | Punchier, tighter limiting | Focus on controlling transients |
| Electronic | Aggressive, consistent levels | Emphasize beat and bass elements |
| Classical/Jazz | Transparent, minimal limiting | Preserve dynamic range and natural sound |
| Pop | Balanced, vocal-focused | Ensure vocal clarity and consistency |
| Hip-Hop | Beat-centric, heavy limiting | Highlight rhythm and bass, control peaks |
8. The Relationship Between LUFS And Limiting
Understanding LUFS In Mastering
LUFS (Loudness Units relative to Full Scale) is a standard measure of perceived loudness over time, and it plays a critical role in modern mastering.
Understanding LUFS is essential for mastering engineers, as it helps ensure that the track adheres to the loudness standards of different broadcasting and streaming platforms.
Limiting directly impacts the LUFS of a track; by controlling the peaks, limiting can increase the perceived loudness while maintaining a degree of dynamic range.
If you want to learn more about LUFS, which is highly advisable in the context of audio limiting, here is a comprehensive article for you:
Balancing Audio Loudness And Dynamics
The challenge in mastering dynamics is to find the perfect balance between loudness and dynamic range. A track with high loudness (low LUFS value) might sound powerful and punchy but could lose its dynamic expression.
Conversely, a track with too much dynamic range might sound too quiet on specific platforms. Effective use of limiting allows audio engineers to strike a balance, achieving a loudness level that makes the track competitive without sacrificing its dynamics.
LUFS Guidelines For Different Platforms
Each streaming platform has its own LUFS guidelines. For example, Spotify might normalize tracks to a different loudness level than Apple Music or YouTube.
Awareness of these guidelines is crucial for mastering engineers to ensure their tracks perform optimally across all platforms. By adjusting the limiting settings accordingly, engineers can ensure that their tracks meet these standards while retaining artistic integrity.
Feel free to read this article for a detailed list of LUFS values and recommendations.
9. Mastering The Art Of Limiting
Critical Takeaways For Limiting In Mastering
Mastering the art of limiting is about understanding and respecting the music’s dynamics while achieving the desired loudness level. The key takeaways for effective limiting include:
- Listening critically.
- Understanding the genre’s requirements.
- Using the right tools.
- Taking care while dialing in values like threshold.
- Constantly learning from each project.
Remember, limiting is not just a technical necessity; it’s an integral part of the creative process in mastering. It does not just affect volume; it also has a distinct impact on the timbre and tone of a track.
Considering The Loudness War In Audio Mastering
The loudness war refers to the trend of increasing audio levels in music over the years, often at the expense of dynamic range and sound quality.
While it’s vital to produce competitively loud tracks, it’s equally important not to fall into the trap of over-limiting. Striking the right balance is crucial.
Mastering engineers should preserve the track’s dynamic integrity while ensuring it sounds robust and transparent on all playback systems.
Tasteful dynamics always outperform loudness!
Applying Limiting In Mastering With Confidence
Applying limiting confidently requires practice, a good ear, and an understanding of the tools at your disposal.
Experiment with different limiters and settings to see what works best for each track. Trust your ears more than meters, and be willing to make bold decisions when necessary.
Remember, every track is different, and what works for one may not work for another. Stay flexible, keep learning, and don’t be afraid to go against the grain if it serves the music.
Happy limiting!
10. FAQ
- What Is The Main Purpose Of Limiting In Mastering?
The primary purpose of limiting in mastering is to control the maximum level of an audio track, preventing peaks from exceeding a certain threshold. This helps avoid distortion and clipping when the track is played back on various systems, ensuring a consistent and high-quality listening experience. Limiting also contributes to achieving a competitive loudness level while maintaining the track’s dynamic range. - How Does Digital Limiting Differ From Analog?
Digital limiting offers precision and flexibility, allowing more control over the limiting parameters. It’s typically more transparent, providing a clean, uncolored sound. Analog limiting, on the other hand, often adds a characteristic warmth and coloration to the sound due to the nature of its hardware components. The choice between digital and analog limiting depends on the desired sonic characteristics and the specific requirements of the track. - How Can I Avoid Over-Limiting My Audio Tracks?
To avoid over-limiting, carefully setting the limiter threshold and output levels is crucial. Ensure the limiting is enough to control the peaks without squashing the track’s dynamics. Regularly bypass the limiter to compare the limited and unlimited versions of the track. This can help you gauge the impact of your limiting and avoid excessive compression. Also, rely on your ears more than visual meters to assess the sound quality. - What Are LUFS And How Do They Relate To Limiting?
LUFS (Loudness Units relative to Full Scale) measures the perceived loudness of an audio track. Limiting directly influences the LUFS value by controlling the dynamic range and peak levels, affecting the perceived loudness. Understanding LUFS is essential for mastering engineers to ensure that their tracks meet the loudness standards of different platforms while maintaining a balanced dynamic range. - Can Limiting Techniques Vary Based On Music Genre?
Limiting techniques can vary significantly based on the music genre. Different genres have different dynamics and sonic characteristics, which require tailored approaches to limiting. For instance, electronic music might benefit from aggressive limiting to achieve a punchy sound, whereas classical music requires a more transparent limiting approach to preserve its dynamic range and expressiveness.

